Как включить SMB 1 в Windows 11 и Windows 10

Протокол SMBv1 в последних версиях Windows по умолчанию отключен, однако в некоторых случаях может потребоваться его включение: как правило, речь идёт о необходимости подключения устаревшего оборудования и компьютеров.
В этой инструкции подробно о том, как включить протокол SMB1 на сервере и клиенте в Windows 11 и Windows 10. Примечание: указанный протокол в настоящее время считается небезопасным и без необходимости включать его не следует.
Включение компонента SMB 1.0
Прежде всего, в новых версиях Windows 11/10 потребуется включить отключенный по умолчанию компонент для поддержки SMBv1, для этого:
- Нажмите клавиши Win+R на клавиатуре, введите appwiz.cpl и нажмите Enter.
- В открывшемся окне в списке слева нажмите «Включение или отключение компонентов Windows».

- Включите компонент «Поддержка общего доступа к файлам SMB 1.0/CIFS» и нажмите «Ок».

- Дождитесь установки необходимых компонентов и перезагрузите компьютер.
Также вы можете включить компонент с помощью команды PowerShell:
Enable-WindowsOptionalFeature -Online -FeatureName SMB1Protocol
После того, как компонент был установлен, может потребоваться включить использование протокола SMB1 для сервера или клиента — в Windows 11 и 10 это выполняется отдельно.
Проверка и включение SMB 1 на клиенте
Для проверки состояния клиентской части протокола SMB1 в Windows 11 и Windows 10 используйте PowerShell или командную строку, запущенную от имени администратора и следующую команду:
sc.exe qc lanmanworkstation
Если в разделе «Зависимости» отсутствует запись mrxsmb10, протокол 1-й версии отключен. Для его включения можно использовать команды:
sc.exe config lanmanworkstation depend= bowser/mrxsmb10/mrxsmb20/nsi sc.exe config mrxsmb10 start= auto

То же самое можно проделать в редакторе реестра:
HKEY_LOCAL_MACHINE\SYSTEM\CurrentControlSet\services\mrxsmb10
HKEY_LOCAL_MACHINE\SYSTEM\CurrentControlSet\Services\LanmanWorkstation

изменить параметр DependOnService, добавив в него строку mrxsmb10
После внесения изменений в реестре, перезагрузите компьютер.
На сервере
Чтобы проверить состояние сервера SMB1 в Windows 11/10 используйте команду
PowerShell Get-SmbServerConfiguration | Select EnableSMB1Protocol
Если в результате вы увидите значение True, использование протокола включено.

При значении False вы можете включить его с помощью команды:
Set-SmbServerConfiguration -EnableSMB1Protocol $true
Для включения SMBv1 на сервере в реестре, измените значение параметра DWORD с именем SMB1 на 1 в разделе реестра
HKEY_LOCAL_MACHINE\SYSTEM\CurrentControlSet\Services\LanmanServer\Parameters

Внимание: по умолчанию параметр отсутствует в этом разделе реестра (при его отсутствии считается, что серверный протокол SMB1 включен). При необходимости вы можете его создать.
Внеся изменения в реестр, выполните перезагрузку компьютера.
А вдруг и это будет интересно:
- Лучшие бесплатные программы для Windows
- Ноутбук тормозит на зарядке или без неё — причины и варианты решения
- 403 Forbidden — что это за ошибка и как исправить?
- Непредвиденная ошибка компонента службы теневого копирования томов — как исправить?
- Ошибка 0x00000005 в Microsoft Store — как исправить?
- Как добавить папку в панель навигации Проводника Windows
- Windows 11
- Windows 10
- Android
- Загрузочная флешка
- Лечение вирусов
- Восстановление данных
- Установка с флешки
- Настройка роутера
- Всё про Windows
- В контакте
- Одноклассники
-
sergio 19.11.2023 в 17:30
How to detect, enable and disable SMBv1, SMBv2, and SMBv3 in Windows
This article describes how to enable and disable Server Message Block (SMB) version 1 (SMBv1), SMB version 2 (SMBv2), and SMB version 3 (SMBv3) on the SMB client and server components.
While disabling or removing SMBv1 might cause some compatibility issues with old computers or software, SMBv1 has significant security vulnerabilities, and we strongly encourage you not to use it. SMB 1.0 isn’t installed by default in any edition of Windows 11 or Windows Server 2019 and later. SMB 1.0 also isn’t installed by default in Windows 10, except Home and Pro editions. We recommend that instead of reinstalling SMB 1.0, you update the SMB server that still requires it. For a list of third parties that require SMB 1.0 and their updates that remove the requirement, review the SMB1 Product Clearinghouse.
Disabling SMBv2 or SMBv3 for troubleshooting
We recommend keeping SMBv2 and SMBv3 enabled, but you might find it useful to disable one temporarily for troubleshooting. For more information, see How to detect status, enable, and disable SMB protocols on the SMB Server.
In Windows 10, Windows 8.1, Windows Server 2019, Windows Server 2016, Windows Server 2012 R2, and Windows Server 2012, disabling SMBv3 deactivates the following functionality:
- Transparent Failover — clients reconnect without interruption to cluster nodes during maintenance or failover
- Scale Out — concurrent access to shared data on all file cluster nodes
- Multichannel — aggregation of network bandwidth and fault tolerance if multiple paths are available between client and server
- SMB Direct — adds RDMA networking support for high performance, with low latency and low CPU use
- Encryption — Provides end-to-end encryption and protects from eavesdropping on untrustworthy networks
- Directory Leasing — Improves application response times in branch offices through caching
- Performance Optimizations — optimizations for small random read/write I/O
In Windows 7 and Windows Server 2008 R2, disabling SMBv2 deactivates the following functionality:
- Request compounding — allows for sending multiple SMBv2 requests as a single network request
- Larger reads and writes — better use of faster networks
- Caching of folder and file properties — clients keep local copies of folders and files
- Durable handles — allow for connection to transparently reconnect to the server if there’s a temporary disconnection
- Improved message signing — HMAC SHA-256 replaces MD5 as hashing algorithm
- Improved scalability for file sharing — number of users, shares, and open files per server greatly increased
- Support for symbolic links
- Client oplock leasing model — limits the data transferred between the client and server, improving performance on high-latency networks and increasing SMB server scalability
- Large MTU support — for full use of 10 Gigabit Ethernet (GbE)
- Improved energy efficiency — clients that have open files to a server can sleep
The SMBv2 protocol was introduced in Windows Vista and Windows Server 2008, while the SMBv3 protocol was introduced in Windows 8 and Windows Server 2012. For more information about SMBv2 and SMBv3 capabilities, see the following articles:
- Server Message Block overview
- What’s New in SMB
How to remove SMBv1 via PowerShell
Here are the steps to detect, disable and enable SMBv1 client and server by using PowerShell commands with elevation.
The computer will restart after you run the PowerShell commands to disable or enable SMBv1.
Get-WindowsOptionalFeature -Online -FeatureName SMB1Protocol Disable-WindowsOptionalFeature -Online -FeatureName SMB1Protocol Enable-WindowsOptionalFeature -Online -FeatureName SMB1Protocol You can detect SMBv1 status, without elevation, by running: Get-SmbServerConfiguration | Format-List EnableSMB1Protocol .
Windows Server 2012 Windows Server 2012 R2, Windows Server 2016, Windows Server 2019: Server Manager method
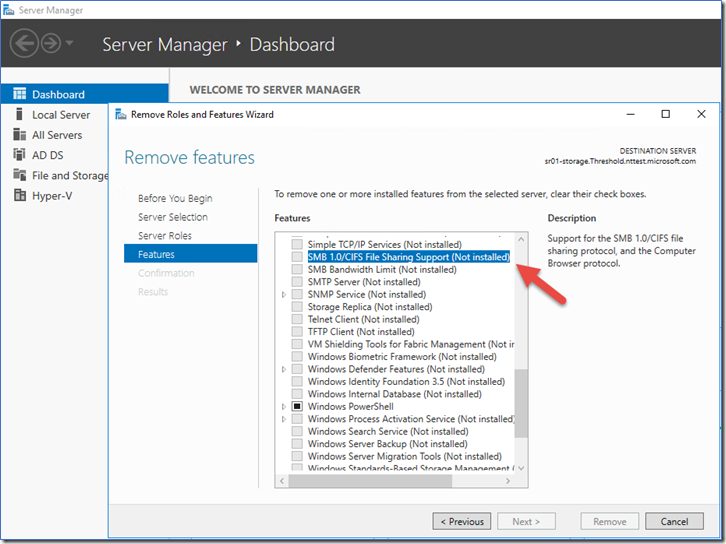
To remove SMBv1 from Windows Server:
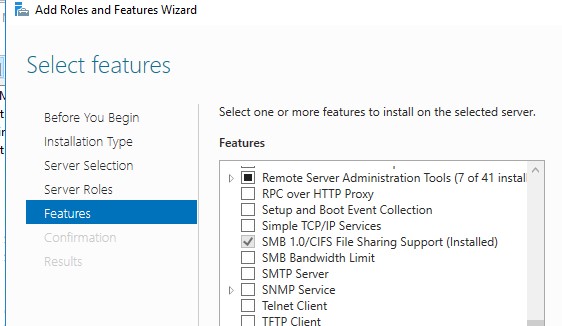
- On the Server Manager Dashboard of the server where you want to remove SMBv1, under Configure this local server, select Add roles and features.
- On the Before you begin page, select Start the Remove Roles and Features Wizard, and then on the following page, select Next.
- On the Select destination server page under Server Pool, ensure that the server you want to remove the feature from is selected, and then select Next.
- On the Remove server roles page, select Next.
- On the Remove features page, clear the check box for SMB 1.0/CIFS File Sharing Support and select Next.
- On the Confirm removal selections page, confirm that the feature is listed, and then select Remove.
Windows 8.1, Windows 10, and Windows 11: Add or Remove Programs method
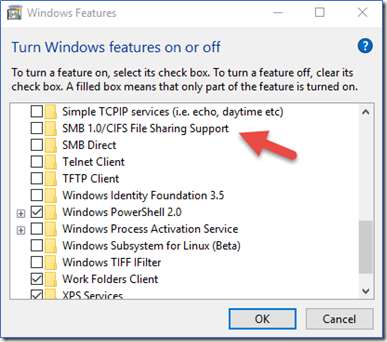
To disable SMBv1 for the mentioned operating systems:
- In Control Panel, select Programs and Features.
- Under Control Panel Home, select Turn Windows features on or off to open the Windows Features box.
- In the Windows Features box, scroll down the list, clear the check box for SMB 1.0/CIFS File Sharing Support and select OK.
- After Windows applies the change, on the confirmation page, select Restart now.
How to detect status, enable, and disable SMB protocols
When you enable or disable SMBv2 in Windows 8 or Windows Server 2012, SMBv3 is also enabled or disabled. This behavior occurs because these protocols share the same stack.
Windows 8 and Windows Server 2012 introduced the new Set-SMBServerConfiguration Windows PowerShell cmdlet. The cmdlet enables you to enable or disable the SMBv1, SMBv2, and SMBv3 protocols on the server component.
You don’t have to restart the computer after you run the Set-SMBServerConfiguration cmdlet.
SMBv1
Get-SmbServerConfiguration | Select EnableSMB1Protocol Set-SmbServerConfiguration -EnableSMB1Protocol $false Set-SmbServerConfiguration -EnableSMB1Protocol $true SMB v2/v3
Get-SmbServerConfiguration | Select EnableSMB2Protocol Set-SmbServerConfiguration -EnableSMB2Protocol $false Set-SmbServerConfiguration -EnableSMB2Protocol $true For Windows 7, Windows Server 2008 R2, Windows Vista, and Windows Server 2008
To enable or disable SMB protocols on an SMB Server that is running Windows 7, Windows Server 2008 R2, Windows Vista, or Windows Server 2008, use Windows PowerShell or Registry Editor.
Additional PowerShell methods
This method requires PowerShell 2.0 or later.
SMBv1 on SMB Server
Get-Item HKLM:\SYSTEM\CurrentControlSet\Services\LanmanServer\Parameters | ForEach-Object
Default configuration = Enabled (No registry named value is created), so no SMB1 value will be returned
Set-ItemProperty -Path "HKLM:\SYSTEM\CurrentControlSet\Services\LanmanServer\Parameters" SMB1 -Type DWORD -Value 0 -Force Set-ItemProperty -Path "HKLM:\SYSTEM\CurrentControlSet\Services\LanmanServer\Parameters" SMB1 -Type DWORD -Value 1 -Force Note You must restart the computer after you make these changes. For more information, see Server storage at Microsoft.
SMBv2/v3 on SMB Server
Get-ItemProperty HKLM:\SYSTEM\CurrentControlSet\Services\LanmanServer\Parameters | ForEach-Object
Set-ItemProperty -Path "HKLM:\SYSTEM\CurrentControlSet\Services\LanmanServer\Parameters" SMB2 -Type DWORD -Value 0 -Force Set-ItemProperty -Path "HKLM:\SYSTEM\CurrentControlSet\Services\LanmanServer\Parameters" SMB2 -Type DWORD -Value 1 -Force You must restart the computer after you make these changes.
Registry Editor
Follow the steps in this section carefully. Serious problems might occur if you modify the registry incorrectly. Before you modify it, back up the registry for restoration in case problems occur.
To enable or disable SMBv1 on the SMB server, configure the following registry key:
HKEY_LOCAL_MACHINE\SYSTEM\CurrentControlSet\Services\LanmanServer\Parameters
Registry entry: SMB1 REG_DWORD: 0 = Disabled REG_DWORD: 1 = Enabled Default: 1 = Enabled (No registry key is created) To enable or disable SMBv2 on the SMB server, configure the following registry key:
HKEY_LOCAL_MACHINE\SYSTEM\CurrentControlSet\Services\LanmanServer\Parameters
Registry entry: SMB2 REG_DWORD: 0 = Disabled REG_DWORD: 1 = Enabled Default: 1 = Enabled (No registry key is created) You must restart the computer after you make these changes.
Here is how to detect status, enable, and disable SMB protocols on the SMB Client that is running Windows 10, Windows Server 2019, Windows 8.1, Windows Server 2016, Windows Server 2012 R2, and Windows Server 2012.
SMBv1 on SMB Client
sc.exe qc lanmanworkstation sc.exe config lanmanworkstation depend= bowser/mrxsmb20/nsi sc.exe config mrxsmb10 start= disabled sc.exe config lanmanworkstation depend= bowser/mrxsmb10/mrxsmb20/nsi sc.exe config mrxsmb10 start= auto SMB v2/v3 on SMB Client
sc.exe qc lanmanworkstation sc.exe config lanmanworkstation depend= bowser/mrxsmb10/nsi sc.exe config mrxsmb20 start= disabled sc.exe config lanmanworkstation depend= bowser/mrxsmb10/mrxsmb20/nsi sc.exe config mrxsmb20 start= auto - You must run these commands at an elevated command prompt.
- You must restart the computer after you make these changes.
Disable SMBv1 by using Group Policy
This section introduces how to use Group Policy to disable SMBv1. You can use this method on different versions of Windows.
SMBv1
This procedure configures the following new item in the registry:
HKEY_LOCAL_MACHINE\SYSTEM\CurrentControlSet\Services\LanmanServer\Parameters
To use Group Policy to configure this, follow these steps:

- Open the Group Policy Management Console. Right-click the Group Policy object (GPO) that should contain the new preference item, and then click Edit.
- In the console tree under Computer Configuration, expand the Preferences folder, and then expand the Windows Settings folder.
- Right-click the Registry node, point to New, and select Registry Item.
In the New Registry Properties dialog box, select the following:
- Action: Create
- Hive: HKEY_LOCAL_MACHINE
- Key Path: SYSTEM\CurrentControlSet\Services\LanmanServer\Parameters
- Value name: SMB1
- Value type: REG_DWORD
- Value data: 0
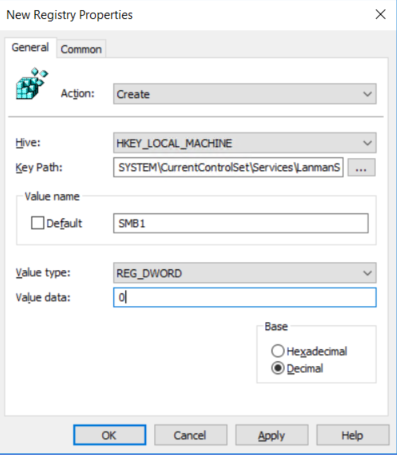
This procedure disables the SMBv1 Server components. This Group Policy must be applied to all necessary workstations, servers, and domain controllers in the domain.
WMI filters can also be set to exclude unsupported operating systems or selected exclusions, such as Windows XP.
Be careful when you make these changes on domain controllers on which legacy Windows XP or older Linux and third-party systems (that don’t support SMBv2 or SMBv3) require access to SYSVOL or other file shares where SMB v1 is being disabled.
SMB v1
To disable the SMBv1 client, the services registry key needs to be updated to disable the start of MRxSMB10, and then the dependency on MRxSMB10 needs to be removed from the entry for LanmanWorkstation so that it can start normally without requiring MRxSMB10 to first start.
This guidance updates and replaces the default values in the following two items in the registry:
HKEY_LOCAL_MACHINE\SYSTEM\CurrentControlSet\services\mrxsmb10
Registry entry: Start REG_DWORD: 4= Disabled
HKEY_LOCAL_MACHINE\SYSTEM\CurrentControlSet\Services\LanmanWorkstation
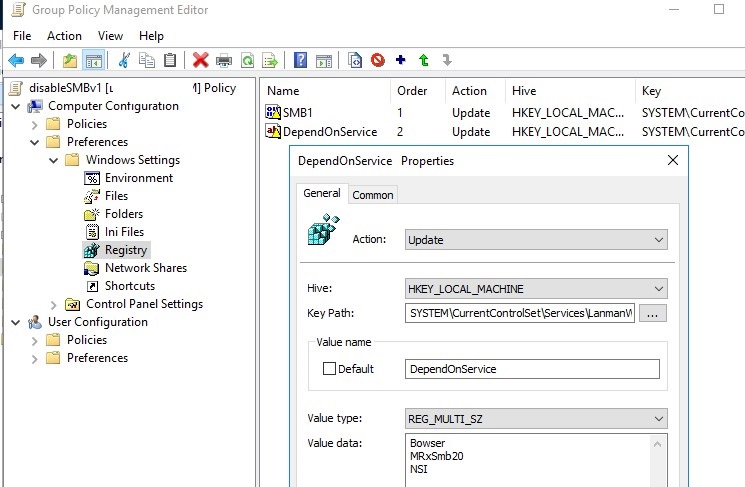
Registry entry: DependOnService REG_MULTI_SZ: «Bowser»,»MRxSmb20″,»NSI»
The default included MRxSMB10 which is now removed as dependency.
To configure this by using Group Policy, follow these steps:
- Open the Group Policy Management Console. Right-click the GPO that should contain the new preference item, and then click Edit.
- In the console tree under Computer Configuration, expand the Preferences folder, and then expand the Windows Settings folder.
- Right-click the Registry node, point to New, and select Registry Item.
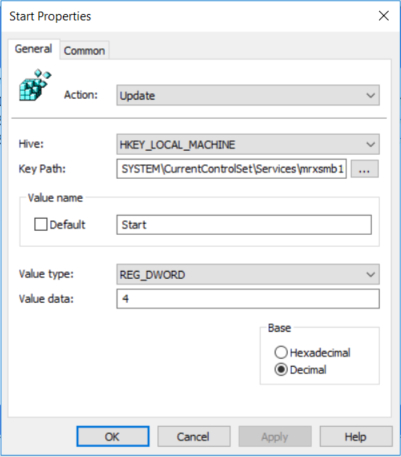
- In the New Registry Properties dialog box, select the following:
- Action: Update
- Hive: HKEY_LOCAL_MACHINE
- Key Path: SYSTEM\CurrentControlSet\services\mrxsmb10
- Value name: Start
- Value type: REG_DWORD
- Value data: 4
- Action: Replace
- Hive: HKEY_LOCAL_MACHINE
- Key Path: SYSTEM\CurrentControlSet\Services\LanmanWorkstation
- Value name: DependOnService
- Value type: REG_MULTI_SZ
- Value data:
- Bowser
- MRxSmb20
- NSI
These three strings will not have bullets (see the following screen shot).

The default value includes MRxSMB10 in many versions of Windows, so by replacing them with this multi-value string, it is in effect removing MRxSMB10 as a dependency for LanmanWorkstation and going from four default values down to just these three values above.
When you use Group Policy Management Console, you don’t have to use quotation marks or commas. Just type each entry on individual lines.
Auditing SMBv1 usage
To determine which clients are attempting to connect to an SMB server with SMBv1, you can enable auditing on Windows Server 2016, Windows 10, and Windows Server 2019. You can also audit on Windows 7 and Windows Server 2008 R2 if the May 2018 monthly update is installed, and on Windows 8.1 and Windows Server 2012 R2 if the July 2017 monthly update is installed.
Set-SmbServerConfiguration -AuditSmb1Access $trueSet-SmbServerConfiguration -AuditSmb1Access $falseGet-SmbServerConfiguration | Select AuditSmb1AccessWhen SMBv1 auditing is enabled, event 3000 appears in the «Microsoft-Windows-SMBServer\Audit» event log, identifying each client that attempts to connect with SMBv1.
Summary
If all the settings are in the same GPO, Group Policy Management displays the following settings.
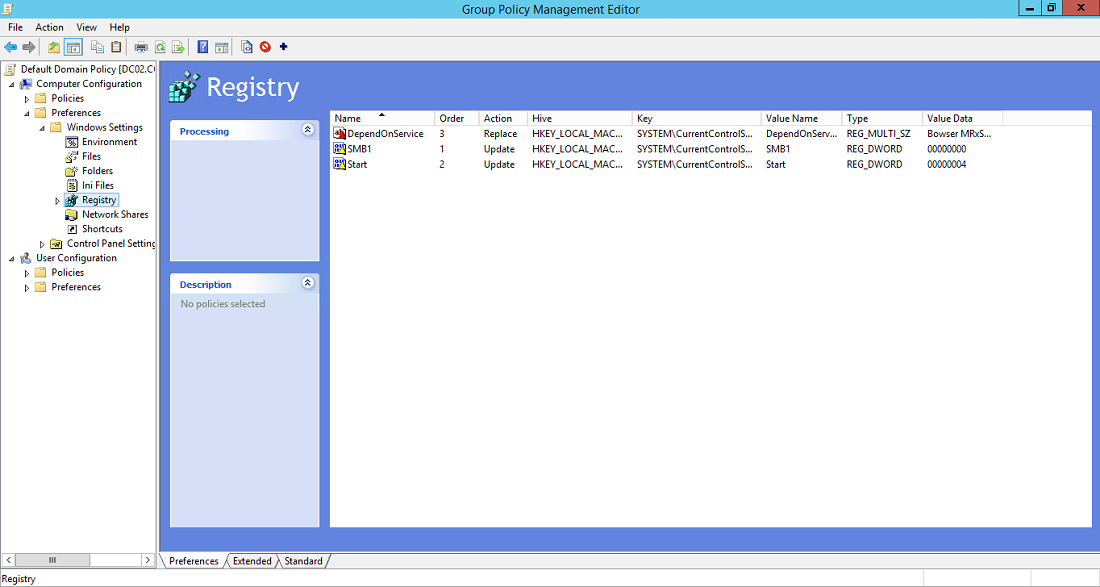
Testing and validation
After completing the configuration steps in this article, allow the policy to replicate and update. As necessary for testing, run gpupdate /force at a command prompt, and then review the target computers to make sure that the registry settings are applied correctly. Make sure SMBv2 and SMBv3 are functioning for all other systems in the environment.
Don’t forget to restart the target systems.
Как включить или отключить протокол SMB 1.0 в Windows 10/11 и Windows Server?

01.12.2023

itpro

PowerShell, Windows 10, Windows 11, Windows Server 2019, Групповые политики

комментариев 29
Протокол доступа к общим файлам SMB 1.0 (Server Message Block) по умолчанию отключен в последних версиях Windows 11 и 10, а также в Windows Server 2019/2022. Эта версия протокола является небезопасной/уязвимой, и не рекомендуется использовать ее на устройствах в локальной сети. Windows поддерживает более безопасные версии протокола SMB (2.x и 3.x).
SMB v1 может быть необходим, только если в вашей сети остались устаревшие устройства с Windows XP/2003, старые версии NAS, сетевые принтеры с поддержкой SMB, устройства со старыми версиями samba, и т.д. В этой статье мы рассмотрим, как включить или отключить протокол общего доступа к файлам SMB 1.0 в Windows.
Обратите внимание что протокол SMB состоит из двух компонентов, которые можно включать/отключать по отдельности:
- Клиент SMB0 – нужен для доступа к общим папками на других компьютерах
- Сервер SMB 0 – должен быть включен, если ваш компьютер используется в качестве файлового сервера, к которому подключаются другие компьютеры и устройства.
Включить/отключить SMB 1.0 в Windows 10 и 11
Начиная с Windows 10 1709, протокол SMB 1 отключен в десктопных версиях Windows, но его можно включить из вручную.
Откройте командную строку и проверить статус компонентов протокола SMBv1 в Windows с помощью команды DISM:
Dism /online /Get-Features /format:table | find «SMB1Protocol»
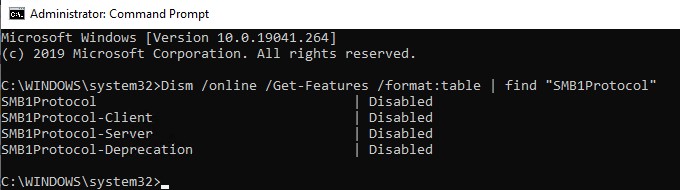
В нашем примере видно, что все компоненты SMBv1 отключены:
SMB1Protocol | Disabled SMB1Protocol-Client | Disabled SMB1Protocol-Server | Disabled SMB1Protocol-Deprecation | Disabled
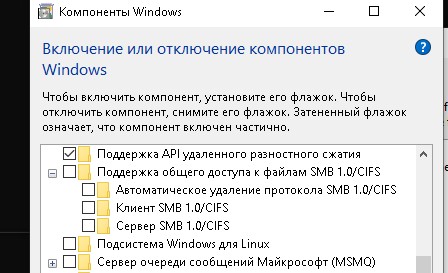
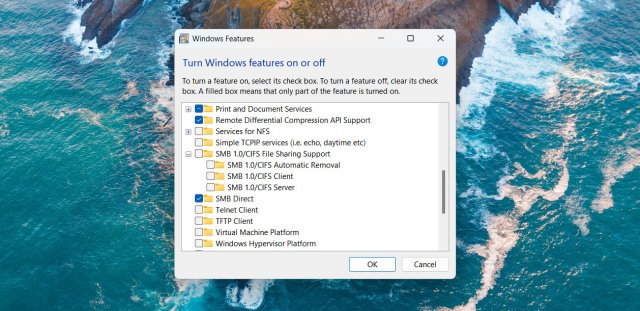
В Windows 10 и 11 также можно управлять компонентами SMB 1 из панели Windows Features ( optionalfeatures.exe ). Разверните ветку Поддержка общего доступа к файлам SMB 1.0 /CIFS (SMB 1.0/CIFS File Sharing Support). Как вы видите здесь также доступны 3 компонента:
- Клиент SMB 1.0/CIFS (SMB 1.0/CIFS Client)
- Сервер SMB 1.0/CIFS (SMB 1.0/CIFS Server)
- Автоматическое удаление протокола SMB0/CIFS (SMB 1.0/CIFS Automatic Removal)
Клиент SMB v1.0 нужно установить, если вашему компьютеру нужен доступ к сетевым папкам на старых устройствах. Если устаревшие сетевые устройства должны писать данные в сетевые папки на вашем компьютере, или использовать его общие сетевые принтеры, нужно включить сервер SMB 1.
Вы можете включить клиент или сервер SMB 1.0 в Windows 10/11 из панели окна управления компонентами или с помощью команд:
Dism /online /Enable-Feature /FeatureName:»SMB1Protocol»
Dism /online /Enable-Feature /FeatureName:»SMB1Protocol-Client»
Dism /online /Enable-Feature /FeatureName:»SMB1Protocol-Server»Также можно включить сервер или клиент SMBv1 с помощью PowerShell:
Enable-WindowsOptionalFeature -Online -FeatureName SMB1Protocol-Server
Enable-WindowsOptionalFeature -Online -FeatureName SMB1Protocol-Client
Если после включения клиента SMBv1, он не используется более 15 дней, он автоматически отключается.
Чтобы выключить SMB1 в Windows, выполните следующие команды DISM:
Dism /online /Disable-Feature /FeatureName:»SMB1Protocol»
Dism /online /Disable-Feature /FeatureName:»SMB1Protocol-Client»
Dism /online /Disable-Feature /FeatureName:»SMB1Protocol-Server»Или удалите компоненты SMB1Protocol с помощью PowerShell:
Disable-WindowsOptionalFeature -Online -FeatureName SMB1Protocol -Remove
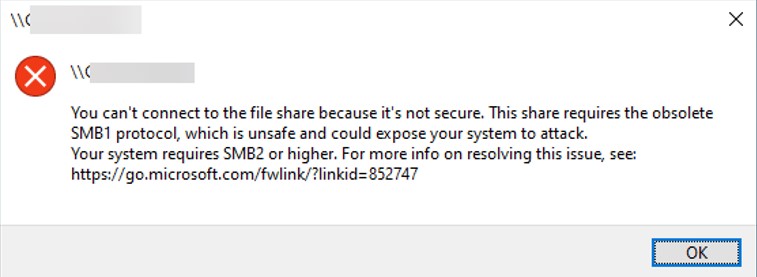
Если вы отключили поддержку SMBv1 клиента в Windows 10/11, то при доступе к сетевой папке на файловом сервере (устройстве), который поддерживает только SMBv1, появятся ошибки вида:
Вы не можете подключиться к общей папке, так как она небезопасна. Эта общая папка работает по устаревшему протоколу SMB1, который небезопасен и может подвергнуть вашу систему риску атаки. Вашей системе необходимо использовать SMB2 или более позднюю версию.
Unable to connect to file shares because it is not secure. This share requires the obsolete SMB1 protocol, which is not secure and could expose your system to attacks
;
Вы не можете подключиться к общей папке, так как она небезопасна. Эта общая папка работает по устаревшему протоколуSMB1, который небезопасен и может подвергнуть вашу систему риску атаки. Вашей системе необходимо использовать SMB2 или более позднюю версию.
You can’t connect to the file share because it’s not secure. This share requires the obsolete SMB1 protocol, which is unsafe and could expose your system to attack. Your system requires SMB2 or higher).
Подробнее это написано в статье Не открываются общие сетевые папки в Windows 10.
Также при отключении клиента SMBv1 на компьютере перестает работать служба Computer Browser (Обозреватель компьютеров), которая используется устаревшим протоколом NetBIOS для обнаружения устройств в сети. Для корректного отображения соседних компьютеров в сетевом окружении Windows нужно настроить службу Function Discovery Provider Host (см. статью).
Включение и отключение SMB 1.0 в Windows Server 2019/2022
В Windows Server 2019 и 2022 компоненты протокола SMBv1 также по умолчанию отключены. Включить SMB v1 в этих версиях можно через Server Manager (компонент SMB 1.0/CIFS File Sharing Support) или с помощью PowerShell.
Проверить, включен ли SMB 1.0 в Windows Server с помощью команды PowerShell:

Чтобы установить клиент SMB 1, выполните команду:
Включить поддержку серверной части SMB 1.0:
Затем проверьте, что протокол SMB 1 включен в настройках SMB сервера. Если протокол отключен, включите его:
Get-SmbServerConfiguration | select EnableSMB1Protocol
Set-SmbServerConfiguration -EnableSMB1Protocol $true -Force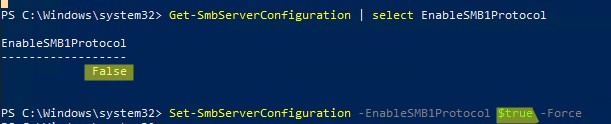
Если в EnableSMB1Protocol = True, значит этот сервер поддерживает SMB 1.0 клеинтов.
Чтобы отключить SMBv1 (понадобится перезагрузка), выполните:
Set-SmbServerConfiguration -EnableSMB1Protocol $false -Force
Disable-WindowsOptionalFeature -Online -FeatureName SMB1ProtocolЧтобы полностью удалить компоненты SMB1 с диска, выполните:
Uninstall-WindowsFeature -Name FS-SMB1 -Remove
В Windows 7/8 и Windows Server 2008 R2/ 2012 можно отключать службу и драйвер доступа SMBv1 командами:
sc.exe config lanmanworkstation depend= bowser/mrxsmb20/nsi
sc.exe config mrxsmb10 start= disabled
Аудит доступа к файловому серверу по SMB v1.0
Перед отключением и полным удалением драйвера SMB 1.0 на стороне файлового сервера желательно убедится, что в сети не осталось устаревших клиентов, которые используют для подключения протокол SMB v1.0. Чтобы найти таких клиентов, нужно включить аудит доступа к файловому серверу по SMB1 протоколу:
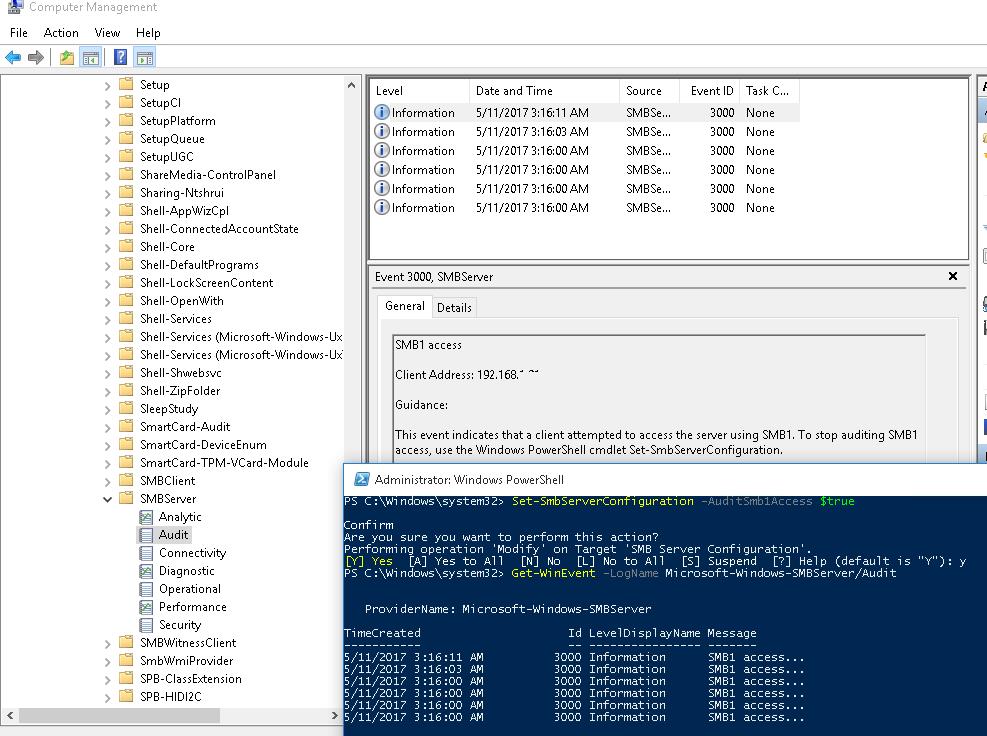
Set-SmbServerConfiguration –AuditSmb1Access $true
Через пару дней откройте на сервере журнал событий Event Viewer -> Applications and Services -> Microsoft -> Windows -> SMBServer -> Audit и проверьте, были ли попытки доступа к ресурсам сервера по протоколу SMB1.
Совет. Список событий из журнала Event Viewer можно вывести командой PowerShell:
Get-WinEvent -LogName Microsoft-Windows-SMBServer/Audit
Проверьте, есть ли в журнале событие с EventID 3000 от источника SMBServer, в котором указано что клиент 192.168.1.10 пытается обратиться к сервере по протоколу SMB1.
SMB1 access Client Address: 192.168.1.10 Guidance: This event indicates that a client attempted to access the server using SMB1. To stop auditing SMB1 access, use the Windows PowerShell cmdlet Set-SmbServerConfiguration.
Вам нужно найти в сети компьютер или устройство с этим IP адресом. Если возможно обновите на нем ОС или прошивку, до версии поддерживающий, более новые протоколы SMBv2 или SMBv3. Если обновить такой клиент не удастся, придется включить SMBv1 на вашем файловом сервере.
Чтобы найти в Active Directory все компьютеры, на которых включен протокол SMB v1, выполните команду:
Эта команда получит список активных компьютеров в домене с помощью командлета Get-ADComputer. Затем с помощью Invoke-Command выполнит подключение через PowerShell Remoting к каждому компьютеру и проверит включен ли сервис SMB 1.0.
gpmc.msc ), создайте новый объект GPO (disableSMBv1) и назначьте его на OU с компьютерами, на которых нужно отключить SMB1;
- Перейдите в режим редактирования политики. Выберите Computer Configuration ->Preferences ->Windows Settings ->Registry;
- Создайте новый параметр реестра (Registry Item) со следующими настройками:
Action: Update
Hive: HKEY_LOCAL_MACHINE
Key Path: SYSTEM\CurrentControlSet\Services\LanmanServer\Parameters
Value name: SMB1
Value type: REG_DWORD
Value data: 0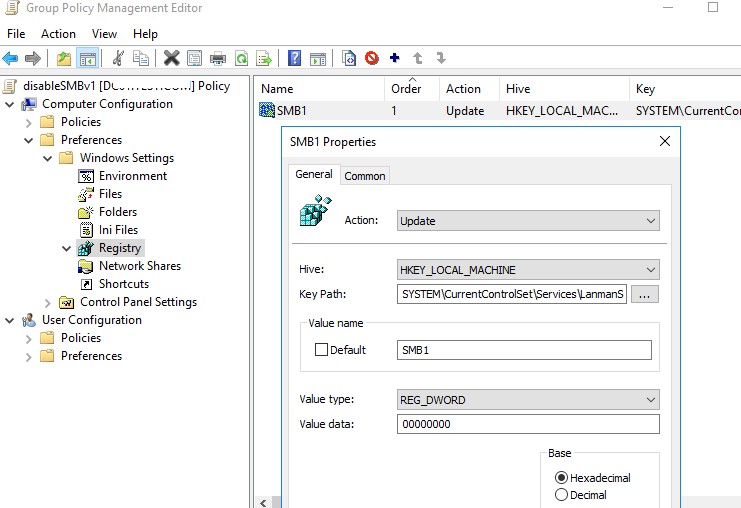
- Данная политика отключит службу сервера SMBv1.
- Параметр Start (типа REG_DWORD) со значением 4 в ветке реестра HKLM\SYSTEM\CurrentControlSet\services\mrxsmb10;
- Параметр DependOnService (типа REG_MULTI_SZ) со значением Bowser, MRxSmb20, NSI (каждое значение с новой строки) в ветке реестра HKLM\SYSTEM\CurrentControlSet\Services\LanmanWorkstation.
Если вы хотите через GPO отключить на компьютерах и клиент SMB 1.0, создайте дополнительно два параметра реестра:
Осталось обновить настройки групповых политик на клиентах и после перезагрузки проверить, что компоненты SMBv1 полностью отключены.
С помощью WMI фильтр GPO можно сделать исключения для определенных версий Windows.
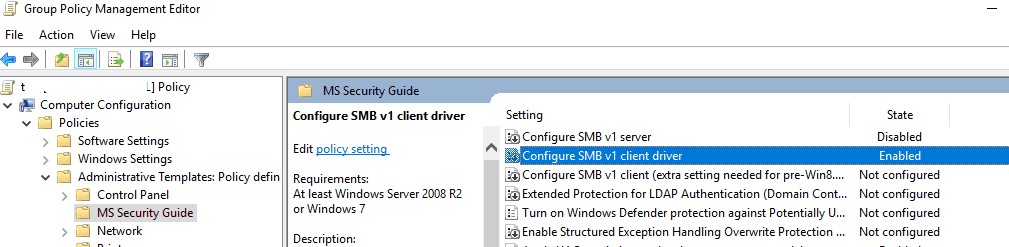
В групповых политиках Security Baseline из Microsoft Security Compliance Toolkit есть отдельный административный шаблон GPO (файлы SecGuide.adml и SecGuide.ADMX), в которых есть отдельные параметры для отключения сервера и клиента SMB:
![]() Предыдущая статья Следующая статья
Предыдущая статья Следующая статья ![]()
SMB1 теперь отключен по умолчанию для инсайдерских сборок Windows 11 Home
SMB1, также известный как Server Message Block, представляет собой стандарт, разработанный в конце 1980-х годов для предоставления общего доступа к файлам и принтерам в сети. Как и все остальное, связанное с ПК и сетью, более 30 лет назад, SMB1 является чрезвычайно устаревшим стандартом, который Microsoft давно перестала поддерживать. В рамках последних усилий по поэтапному отказу от SMB1 Microsoft объявила, что больше не устанавливает SMB1 по умолчанию ни в одном варианте Windows, теперь включая предварительные сборки Windows 11 Home из канала Dev.
Клиент SBM1 останется доступным в Windows 11 для систем, которым необходимо подключаться к устаревшему оборудованию (компьютеры на фабриках, медицинское оборудование, потребительские NAS и т. д.) без какой-либо поддержки, кроме SMB1. Пользователи могут установить клиент SMB1 из списка необязательных функций Windows. Microsoft планирует удалить все связанные с SMB1 двоичные файлы и драйвера из Windows в будущих обновлениях. Кроме того, компания заявила, что выпустит внештатный неподдерживаемый установочный пакет для организаций, которые не могут отказаться от SMB1 в пользу более современных и безопасных стандартов.
Если вы хотите проверить статус SMB1 или включить его клиент, нажмите Win + R и введите команду optionalfeatures. Прокрутите список функций вниз и поставьте галочку рядом с «SMB 1.0/CIFS File Sharing Support».
Microsoft отказалась от SMB1 в 2013 году из-за многочисленных проблем. С 2017 года компания не поставляет большинство версий Windows с включенным SMB1 по умолчанию, но сохраняет возможность включения клиента в редакциях Home и Pro. Если операционная система не обнаруживает исходящего трафика SMB1 в течение 15 дней, она автоматически отключает клиент.
Как заявила компания, SMB1 — это стандарт более чем тридцатилетней давности для мира, которого больше не существует. Все должны прекратить использовать SMB1 и оставить его позади.