Create a new project in Visual Studio
Applies to: ![]() Visual Studio
Visual Studio ![]() Visual Studio for Mac
Visual Studio for Mac ![]() Visual Studio Code
Visual Studio Code
In this article, we’ll show you how to quickly create a new project in Visual Studio from a template.
Open the «Create a new project» dialog
There are multiple ways to create a new project in Visual Studio. When you first open Visual Studio, the start window appears, and from there, you can select Create a new project.
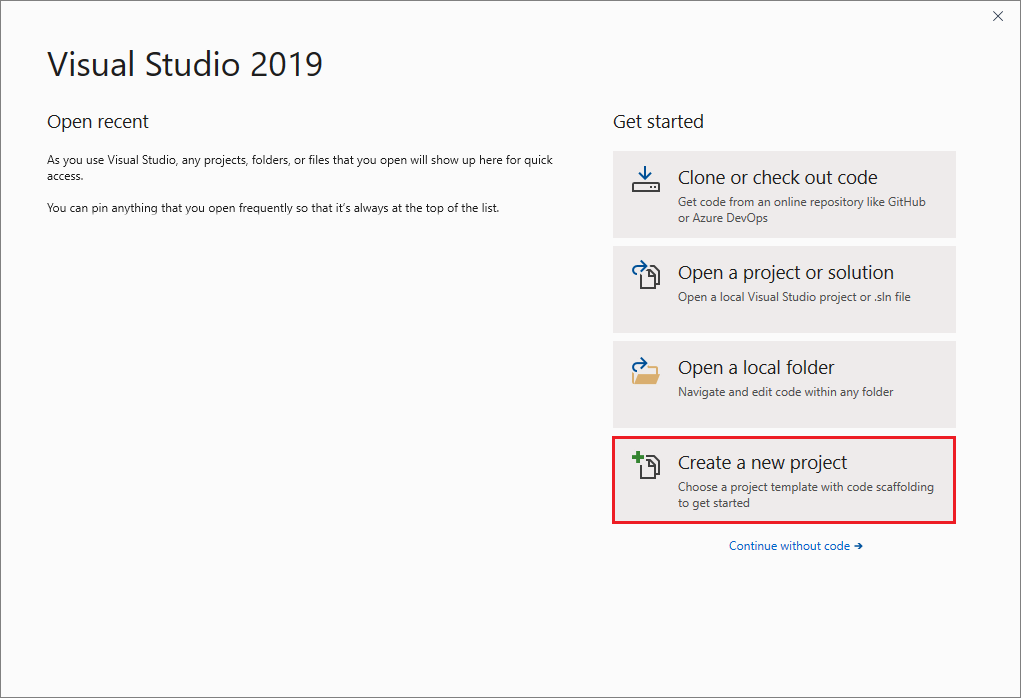
If the Visual Studio development environment is already open, you can create a new project by choosing File > New > Project on the menu bar. You can also select the New Project button on the toolbar, or press Ctrl+Shift+N.

Open the «Create a new project» dialog
There are multiple ways to create a new project in Visual Studio. When you first open Visual Studio, the start window appears, and from there, you can select Create a new project.
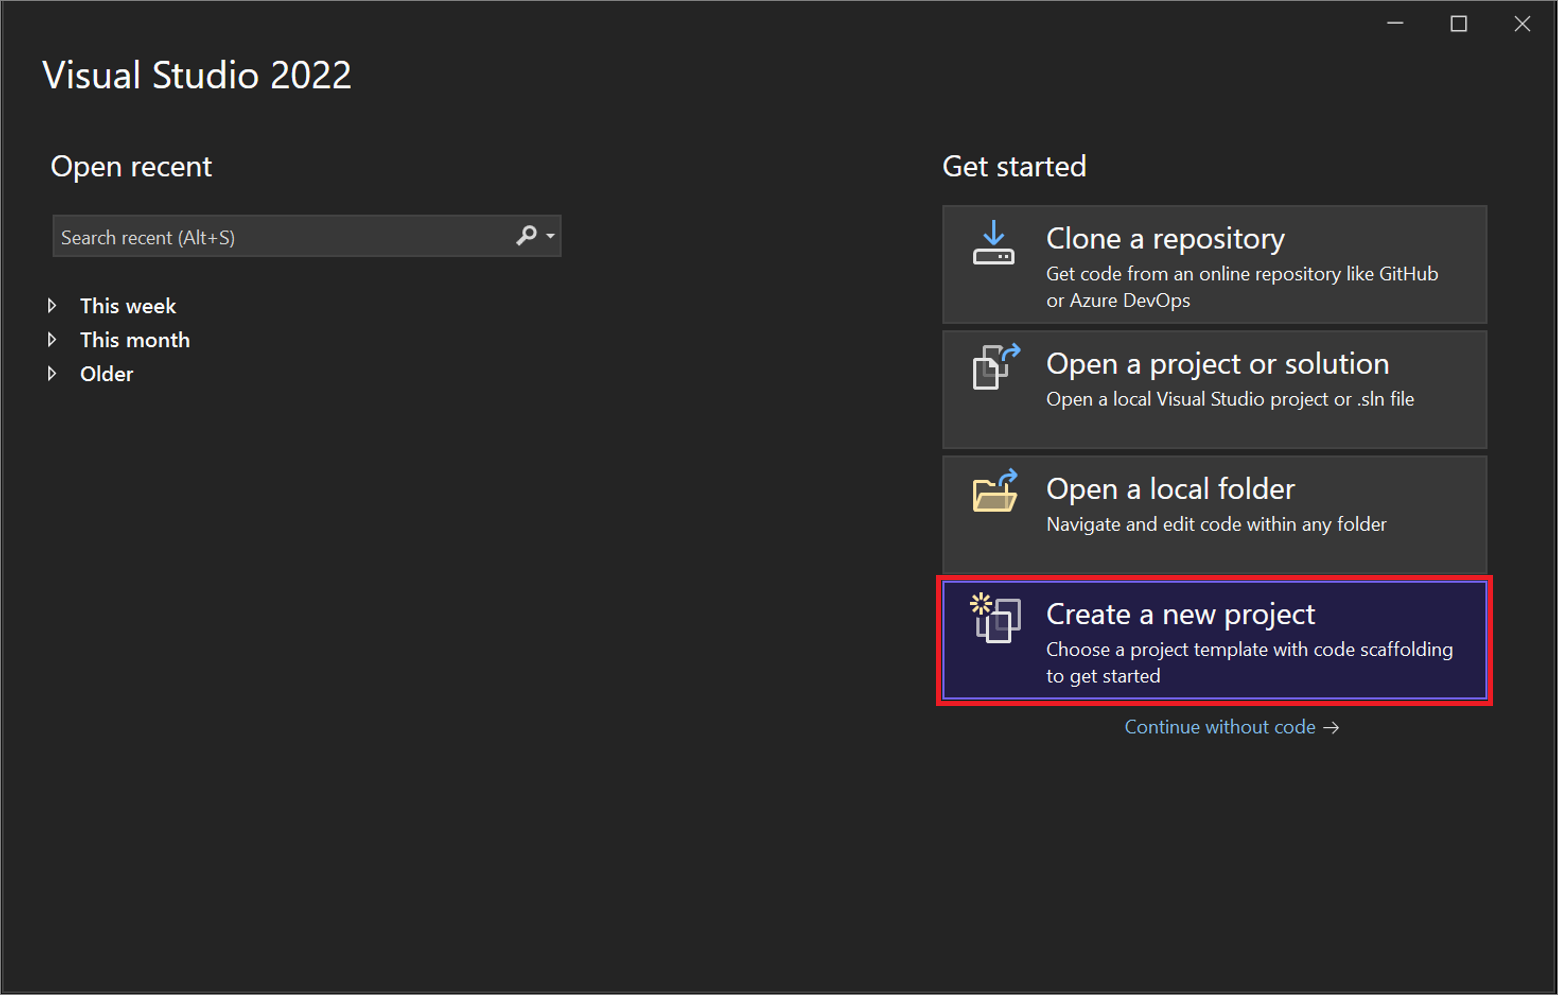
If the Visual Studio development environment is already open, you can create a new project by choosing File > New > Project on the menu bar. You can also select the New Project button on the toolbar, or press Ctrl+Shift+N.

Select a template type
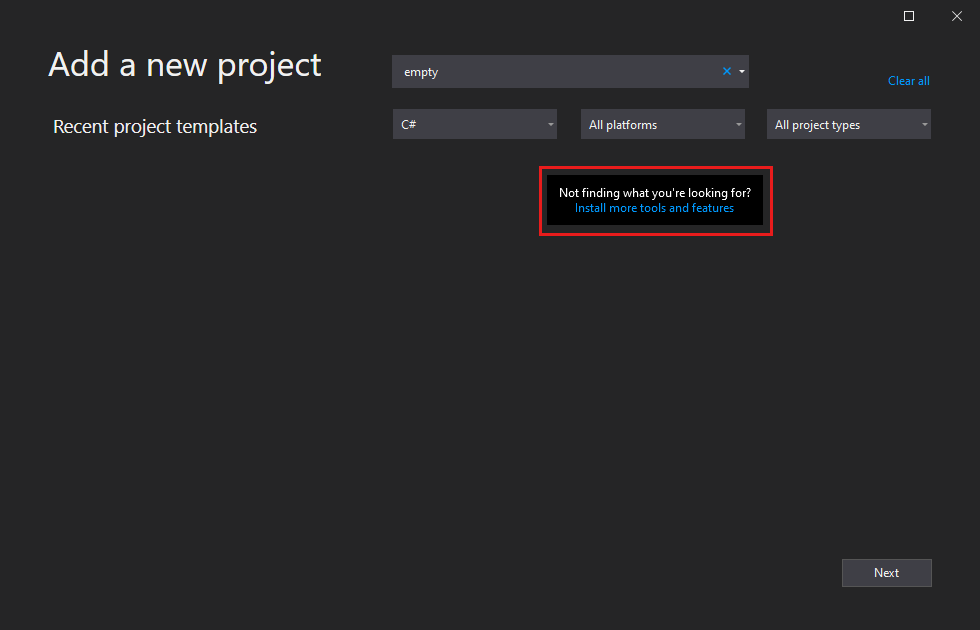
On the Create a new project dialog, a list of your recently selected templates appears on the left. The templates are sorted by most recently used.
If you’re not selecting from the recently used templates, you can filter all available project templates by Language (for example, C# or C++), Platform (for example, Windows or Azure), and Project type (for example, Desktop or Web). You can also enter search text into the search box to further filter the templates, for example, asp.net.
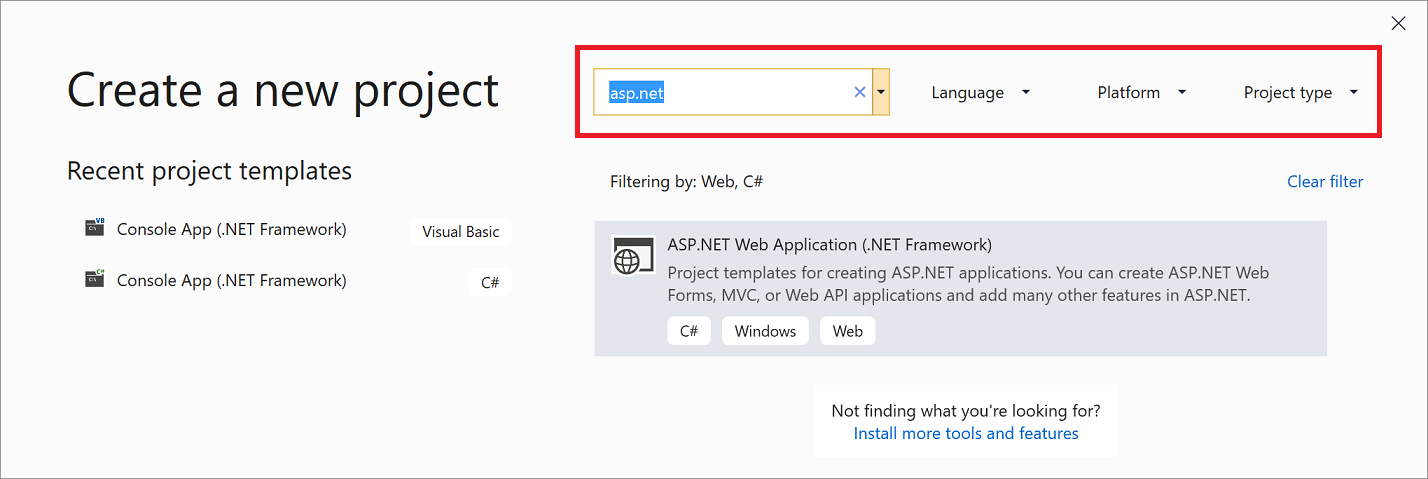
The tags that appear under each template correspond to the three dropdown filters (language, platform, and project type).
If you don’t see the template you’re looking for, you might be missing a workload for Visual Studio. To install additional workloads, for example, Azure Development or Mobile Development with .NET, select the Install more tools and features link to open Visual Studio Installer. From there, select the workloads you want to install, and then select Modify. After that, additional project templates will be available to choose from.

Select a template and then select Next.
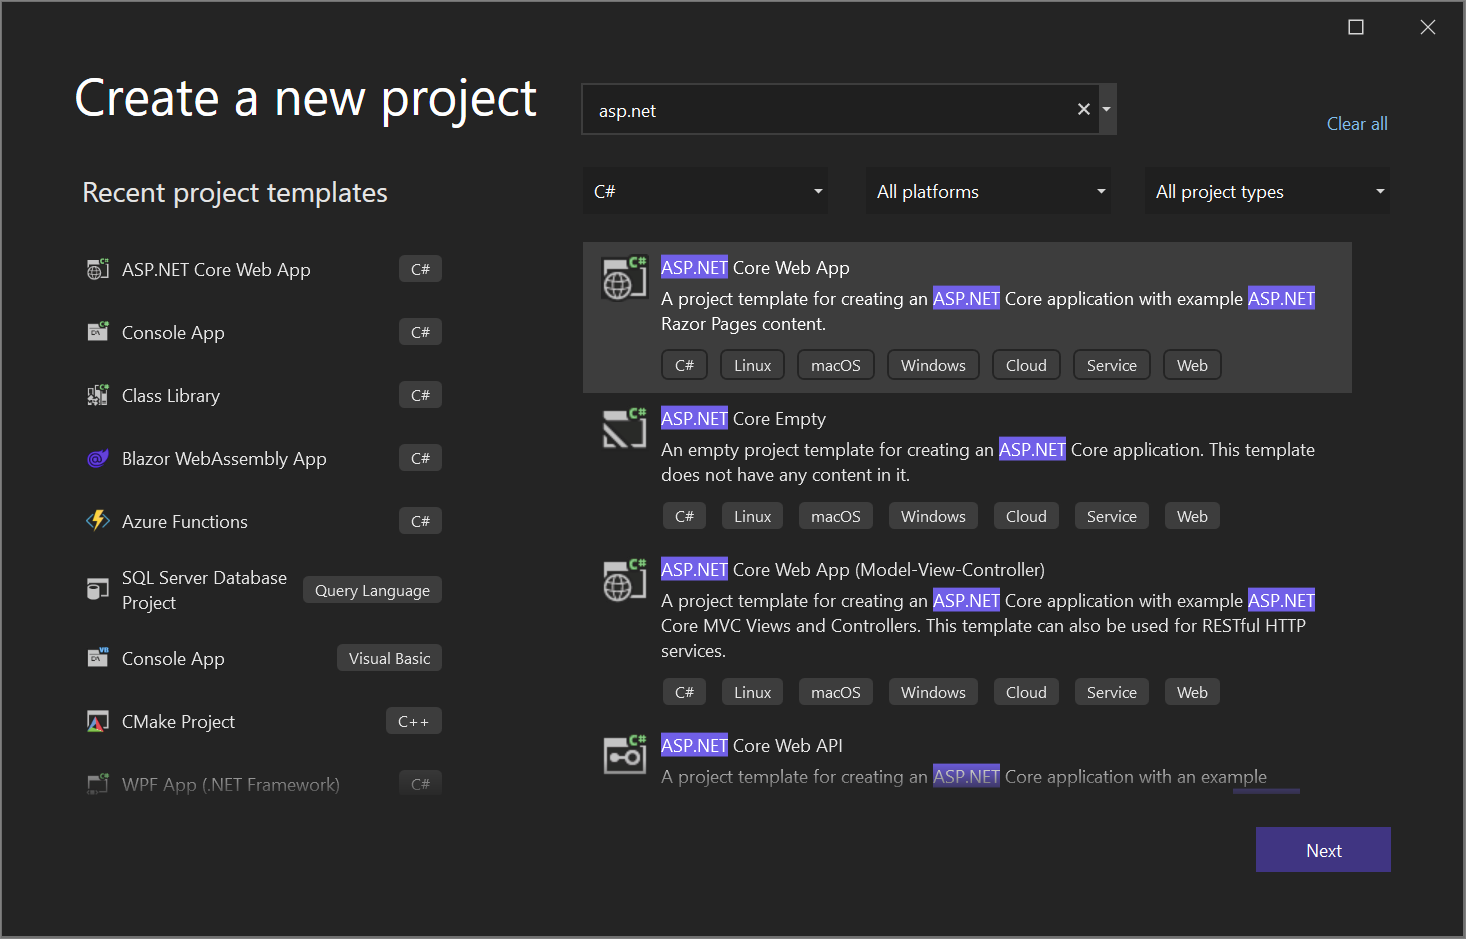
Configure your new project
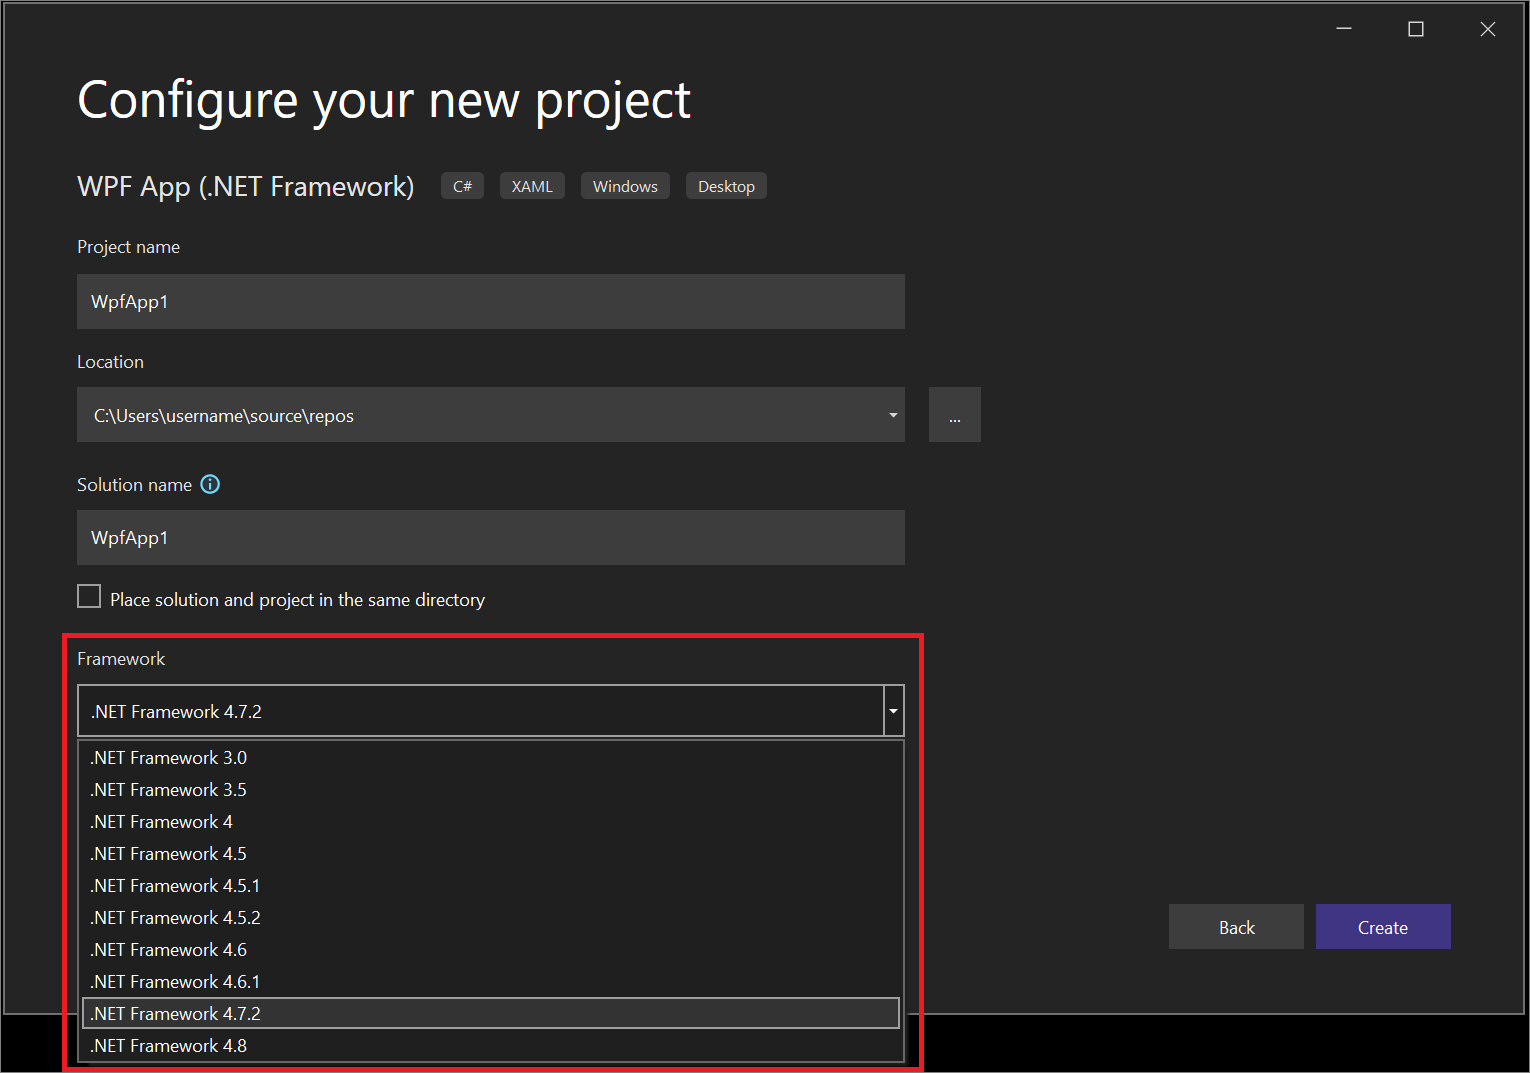
The Configure your new project dialog has options to name your project (and solution), select a disk location, and select a Framework version (if applicable to the template you chose).
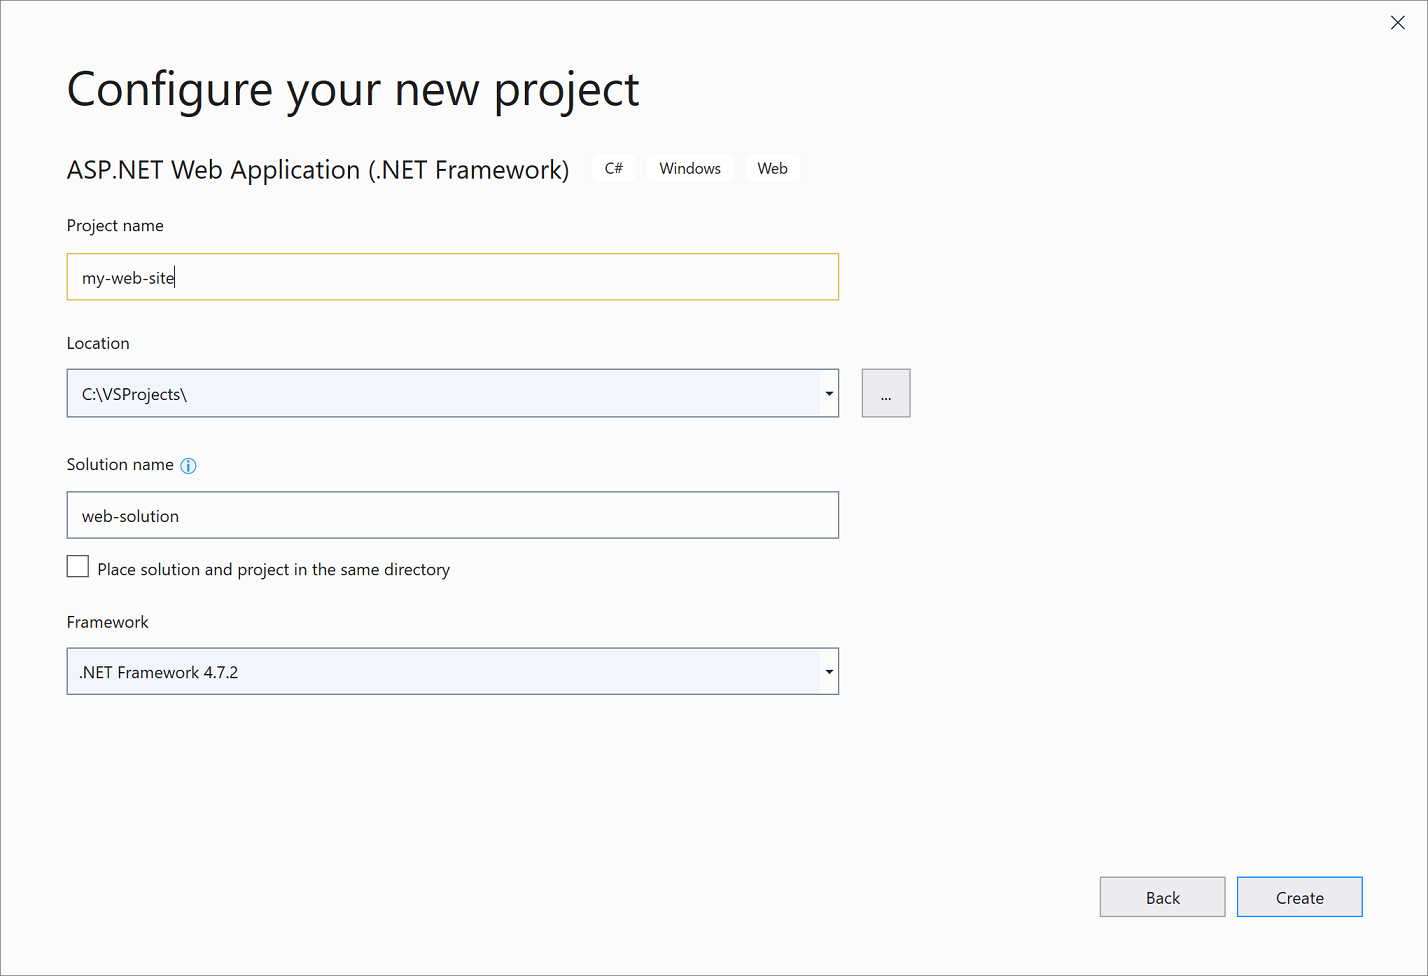
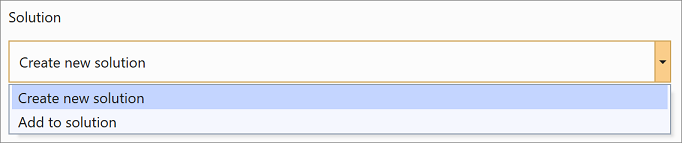
If you create a new project when you already have a project or solution open in Visual Studio, an extra configuration option is available. You can choose to create a new solution or add the new project to the solution that’s already open.
Select Create to create the new project.
Configure your new project
The Configure your new project dialog has options to name your project (and solution), select a disk location, and more.
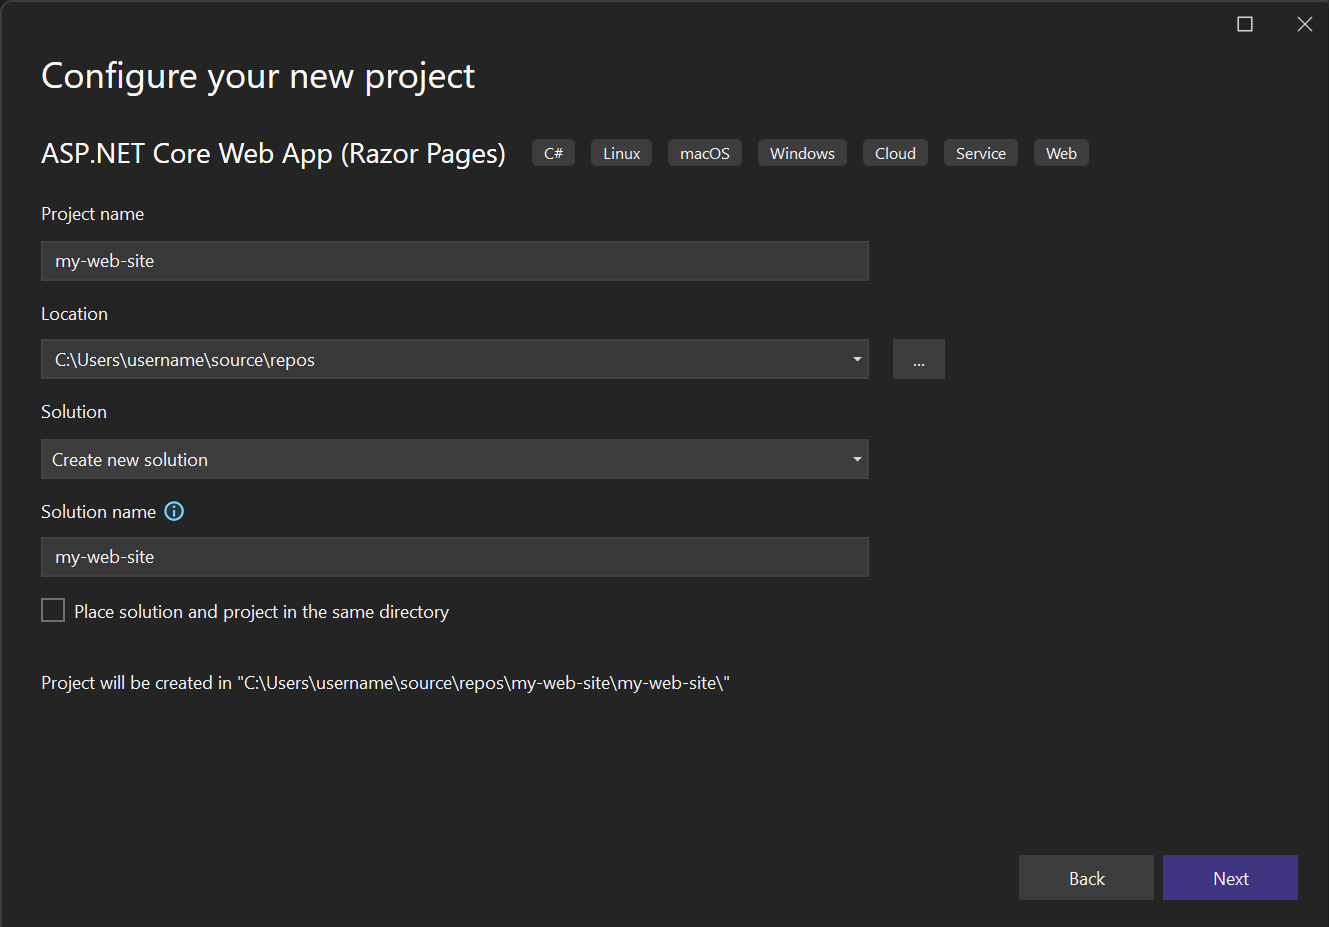
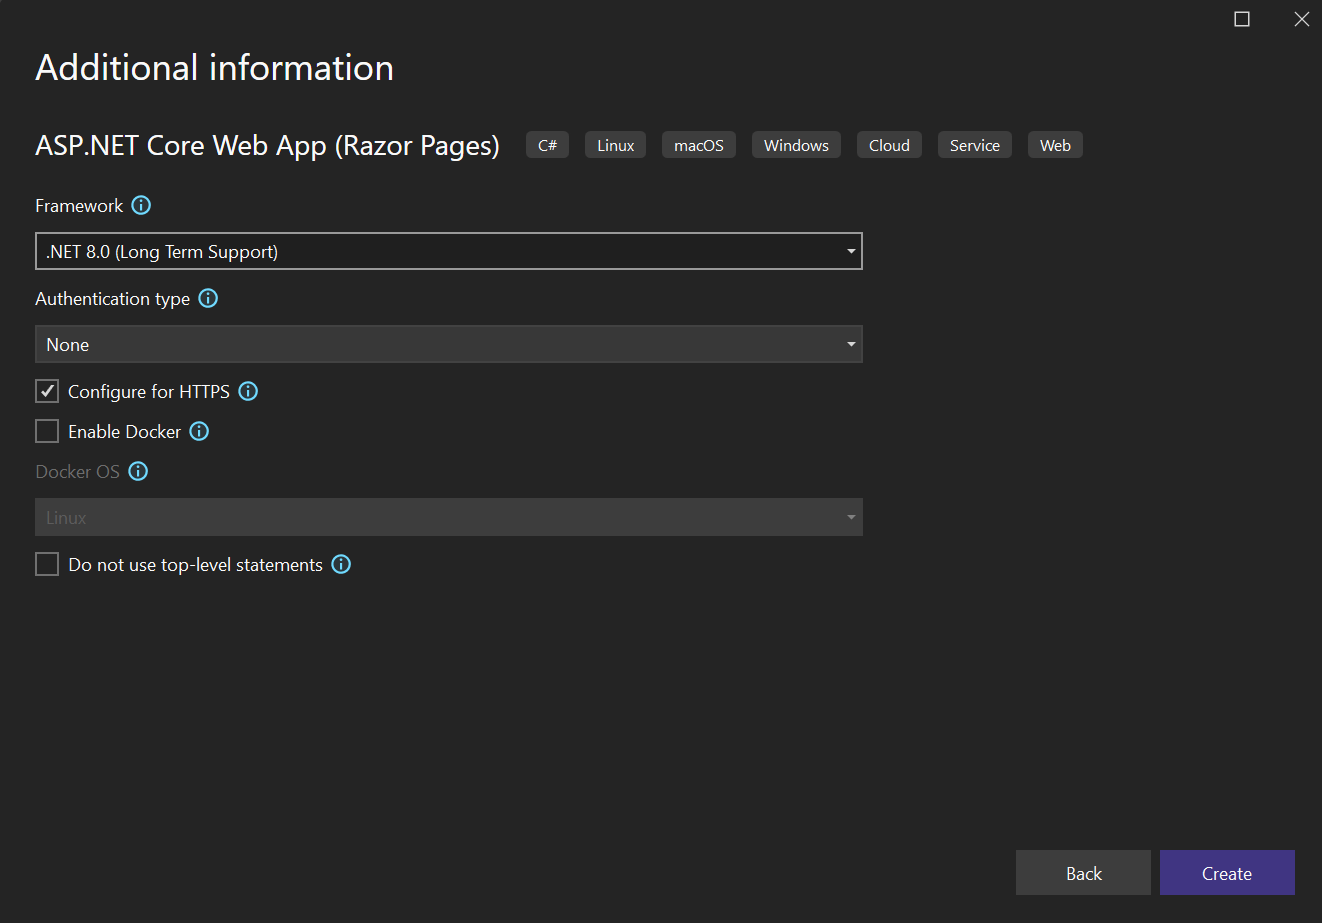
The Additional information dialog includes options to select a Framework version, an authentication type, and more.
Select Create to create the new project.
Add another project to a solution
If you want to add another project to a solution, right-click the solution node in Solution Explorer and then select Add > New Project.
For an example of a project and solution created from scratch, complete with step-by-step instructions and sample code, see Introduction to projects and solutions.
Related content
Создавайте проекты и решения Visual Studio, работайте с ними и удаляйте их
Область применения:![]() Visual Studio Visual Studio для Mac
Visual Studio Visual Studio для Mac ![]() Visual Studio Code
Visual Studio Code ![]()
Из этой статьи вы узнаете, как создавать с нуля и использовать проекты Visual Studio для хранения артефактов, необходимых для создания приложений. Если вы не знакомы с проектами в Visual Studio, см. этот обзор проектов и решений. Сведения о том, как быстро создать проект из шаблона, см. в статье «Создание нового проекта в Visual Studio».
Проекты содержат объекты, необходимые для создания приложения в Visual Studio, например файлы исходного кода, растровые изображения, значки, а также ссылки на компоненты и службы. Когда вы создаете проект, Visual Studio создает решение, в котором будут содержаться проекты. После этого в решение при необходимости можно добавить другие новые или существующие проекты. Можно также создавать пустые решения. Решения также могут содержать файлы, не связанные с определенным проектом.

Этот раздел относится к Visual Studio в Windows. Информацию о Visual Studio для Mac см. в статье Создание проектов в Visual Studio для Mac.
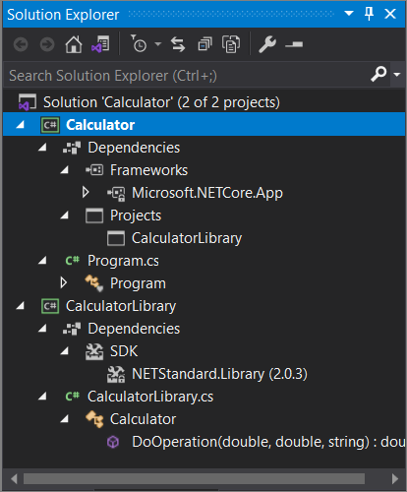
Решения и проекты можно просматривать в окне инструментов, которое называется обозревателем решений. На следующем снимке экрана показан пример консольного решения C# в Обозреватель решений, который содержит два проекта: Калькулятор и КалькуляторLibrary. Каждый проект содержит несколько файлов и папок. Полужирным шрифтом выделено имя запускаемого проекта. Этот проект выполняется при запуске приложения. Вы можете выбрать запускаемый проект.

Вы можете создать проект самостоятельно, добавив в него необходимые файлы, однако в Visual Studio также предлагается ряд шаблонов, помогающих быстро приступить к работе. Используя шаблон, вы получаете проект, который уже содержит все основные компоненты для проекта данного типа. Вы можете переименовывать файлы, как вам требуется, а также добавлять новый или существующий код и другие ресурсы.
Это говорится, что решения и проекты не требуются для разработки приложений в Visual Studio. Вы также можете открыть код, клонированные из Git или скачанный в другом месте. Дополнительные сведения см. в статье Разработка кода в Visual Studio без использования проектов и решений.
Создание проекта из шаблона проекта
Сведения о том, как выбрать шаблон для создания нового проекта, см. в статье Создание проекта в Visual Studio. А пример проекта и решения, созданного с нуля, а также пошаговые инструкции и пример кода см. в статье Общие сведения о проектах и решениях.
Создание проекта из существующих файлов с текстом программ
Если у вас есть коллекция файлов исходного кода, вы можете легко добавить их в проект.
- Последовательно выберите Файл>Создать>Project From Existing Code (Проект из существующего кода).
- В мастере создания проекта по существующим файлам с кодом выберите в раскрывающемся списке Задать тип проекта нужный тип проекта, а затем нажмите Далее.
- В мастере перейдите к месту хранения файлов и введите имя нового проекта в поле Имя. По завершении нажмите кнопку «Готово «.
Этот вариант лучше всего подходит для относительно простой коллекции файлов. Сейчас поддерживаются только типы проектов C++, Apache Cordova, Visual Basic и C#.
Добавление файлов в решение
Если у вас есть файлы, которые относятся к нескольким проектам, например файл сведений для решения или иные файлы, которые относятся к уровню решения, а не отдельного проекта, их можно добавить в само решение. Чтобы добавить элемент в решение, щелкните правой кнопкой мыши узел решения в Обозревателе решений и выберите в контекстном меню пункты Добавить>Новый элемент или Добавить>Существующий элемент.
Файл решения представляет собой структуру для организации проектов в Visual Studio. Он содержит состояние этих сведений в двух файлах: SLN (текстовый файл, общий) и SUO (двоичный, скрытый, параметры решения для конкретного пользователя). Таким образом, решение — это не ресурс, который нужно копировать и переименовывать; вместо этого лучше создать новое решение, а затем добавить в него существующие элементы.
Сравнение файлов
Начиная с версии 17.7 можно сравнить файлы в Обозреватель решений с помощью параметров контекстного меню правой кнопкой мыши. Дополнительные сведения см. в разделе «Средство сравнения файлов» на странице «Сведения о Обозреватель решений».
Создание проекта .NET, настроенного для конкретной версии .NET Framework
При создании проекта .NET Framework можно указать определенную версию платформы .NET Framework, которую он должен использовать. (При создании проекта .NET Core версию платформы указывать не нужно.)
Чтобы указать версию платформа .NET Framework, выберите раскрывающееся меню Framework на странице «Настройка нового проекта«.

Создание пустых решений
Вы также можете создавать пустые решения, не содержащие проектов. Это может быть предпочтительно, если вы хотите создать решение и проекты с нуля.
Создание пустого решения
- В строке меню выберите Файл>Создать>Проект.
- В поле поиска на странице Создание проекта введите решение.
- Выберите шаблон «Пустое решение » и нажмите кнопку «Далее«.
- Введите значение Имя и Расположение для решения, а затем нажмите Создать.
После создания пустого решения к нему можно добавить новые или существующие проекты или элементы, выбрав пунктДобавить новый элемент или Добавить существующий элемент в меню Проект.
Как было сказано ранее, вы также можете открывать файлы кода без использования проекта или решения. Сведения о разработке кода таким образом см. в статье Разработка кода в Visual Studio без использования проектов и решений.
Удаление решения, проекта или элемента
Контекстное меню можно использовать для удаления решений, проектов или элементов в Visual Studio, но только, чтобы удалить их из текущего решения или проекта.
Чтобы полностью удалить решение или другой компонент из системы, удалите папку, содержащую файлы SLN и SUO решения, используя проводник Windows. (Перед удалением решения вы, возможно, захотите выполнить резервное копирование проектов и файлов на случай, если они вам понадобятся позже).
SUO-файл является скрытым и не отображается, если проводник имеет параметры по умолчанию. Для отображения скрытых файлов в меню Вид проводника установите флажок Скрытые элементы.
Окончательное удаление решения
Вы можете перейти к проводнику в Windows, используя Обозреватель решений в Visual Studio. Это делается следующим образом.
- В Обозревателе решений щелкните правой кнопкой мыши меню (контекстное меню) решение, которое вы хотите удалить, и выберите Открыть папку в проводнике.
- В проводнике перейдите на один уровень вверх.
- Выберите папку, содержащую решение, и нажмите клавишу DELETE.
Связанный контент
- Общие сведения о проектах и решениях
- Управление свойствами проектов и решений
- Фильтрация решений в Visual Studio
- Примеры кода от разработчиков
Что такое решения и проекты в Visual Studio?
Область применения:![]() Visual Studio Visual Studio для Mac
Visual Studio Visual Studio для Mac ![]() Visual Studio Code
Visual Studio Code ![]()
В этой статье описывается разница между проектом и решением в Visual Studio. В нем также кратко описывается создание проекта и использование окна инструментов Обозреватель решений для взаимодействия с проектами и решениями.
Проекты
При создании в Visual Studio приложения или веб-сайта вы начинаете с проекта. С логической точки зрения проект содержит все файлы, которые будут скомпилированы в исполняемую программу, библиотеку или веб-сайт. Эти файлы могут включать исходный код, значки, изображения, файлы данных и многое другое. Проект также содержит параметры компилятора и другие файлы конфигурации, которые может потребоваться для взаимодействия программы с различными службами или компонентами.
Файл проекта
Visual Studio использует MSBuild для создания каждого проекта в решении, и каждый проект содержит файл проекта MSBuild. Расширение имени файла отражает тип проекта, например проект C# (CSPROJ), проект Visual Basic (VBPROJ) или проект базы данных (DBPROJ). Файл проекта — это XML-документ, содержащий все сведения и инструкции, необходимые MSBuild для создания проекта. Такие сведения и инструкции включают содержимое, требования к платформе, сведения о версиях, параметры веб-сервера или сервера базы данных, а также задачи для выполнения.
Файлы проекта основаны на схеме XML MSBuild. Чтобы просмотреть содержимое более новых файлов проекта в стиле SDK в Visual Studio, щелкните правой кнопкой мыши узел проекта в Обозреватель решений и выберите «Изменить проекта». Чтобы просмотреть содержимое проектов .NET, сначала выгрузите проект (щелкните правой кнопкой мыши узел проекта в Обозреватель решений и выберите «Выгрузить проект«). Затем щелкните проект правой кнопкой мыши и выберите пункт Изменить .
Использовать решения или проекты в Visual Studio для редактирования, сборки и отладки кода необязательно. Можно просто открыть папку с файлами исходного кода в Visual Studio и начать редактирование. Дополнительные сведения см. в статье Разработка кода в Visual Studio без использования проектов и решений.
Создать новые проекты
Самый простой способ создать новый проект — использовать шаблон проекта с нужным типом проекта. Шаблон проекта содержит базовый набор предварительно созданных файлов кода, файлов конфигурации, ресурсов и параметров. Для выбора шаблона проекта нажмите Файл>Создать>Проект. Дополнительные сведения см. в статье Создание проекта в Visual Studio.
Вы можете также создать пользовательский шаблон проекта, чтобы затем использовать его для создания новых проектов. Дополнительные сведения см. в статье Создание шаблонов проектов и элементов.
При создании нового проекта Visual Studio сохраняет его в расположении по умолчанию — %USERPROFILE%\source\repos. Чтобы изменить это расположение, перейдите в раздел Средства>Параметры>Проекты и решения>Расположения. Дополнительные сведения см. в диалоговом окне «Параметры»: «Проекты и решения>».
Решения
Проект находится внутри решения. Несмотря на его имя, решение не является «ответом». Это просто контейнер для одного или нескольких связанных проектов, а также сведения о сборке, параметры окна Visual Studio и любые другие файлы, которые не связаны с определенным проектом.
Файл решения
В Visual Studio используются два типа файлов (SLN и SUO) для хранения параметров, связанных с решениями:
| Расширение | Имя | Описание |
|---|---|---|
| .SLN | Решение Visual Studio | Организует проекты, элементы проектов и решений в решении. |
| SUO | Параметры пользователя решения | Сохраняет настройки и параметры уровня пользователя, например точки останова. |
Решение описывается текстовым файлом (SLN) в собственном уникальном формате; его обычно не изменяют вручную. И наоборот, SUO-файл является скрытым и не отображается, если проводник имеет параметры по умолчанию. Для отображения скрытых файлов в меню Вид проводника установите флажок Скрытые элементы.
Папка решения
Папка решения — это виртуальная папка, которая доступна только в Обозревателе решений, где с ее помощью можно группировать проекты в решении. Если нужно найти файл решения на компьютере, перейдите к разделу Средства>Параметры>Проекты и решения>Расположения. Дополнительные сведения см. в диалоговом окне «Параметры»: «Проекты и решения>».
Пример проекта и решения, созданного с нуля, а также пошаговые инструкции и пример кода см. в статье Общие сведения о проектах и решениях.
Обозреватель решений
После создания проекта можно просматривать проект, решение и связанные с ними элементы, а также для управлять ими с помощью обозревателя решений. На следующем рисунке показан обозреватель решений с решением C#, включающим два проекта:
Панель инструментов в верхней части Обозреватель решений имеет кнопки для перехода с представления решения на представление папки, фильтрация ожидающих изменений, отображение всех файлов, свертывание всех узлов, просмотр страниц свойств, предварительный просмотр кода в редакторе кода и многое другое.
Многие команды меню доступны в контекстном меню правой кнопкой мыши для различных элементов в Обозреватель решений. К таким командам относится сборка проекта, управление пакетами NuGet, добавление ссылок, переименование файла и запуск тестов. Это лишь некоторые из них. Дополнительные сведения см. в разделе Сведения об Обозревателе решений.
Начиная с версии 17.7, вы также можете сравнить файлы в Обозреватель решений с помощью параметров контекстного меню правой кнопкой мыши. Дополнительные сведения см. в разделе «Средство сравнения файлов» на странице «Сведения о Обозреватель решений».
В обозревателе решений можно настроить способ вложения файлов для проектов ASP.NET Core. Дополнительные сведения см. в разделе «Вложение файлов» в Обозреватель решений.
Если вы закрыли Обозреватель решений и хотите вновь открыть его, выберите Вид>Обозреватель решений в строке меню или нажмите клавиши CTRL+ALT+L. Если же вы закрыли боковые вкладки и хотите восстановить их в расположениях по умолчанию, выберите Окно>Сброс макета окон в строке меню.
Чтобы просмотреть изображения и значки приложений, отображаемые в Visual Studio, скачайте библиотеку изображений Visual Studio.
Связанный контент
- Управление свойствами проектов и решений
- Фильтрация решений в Visual Studio
- Справочник по миграции и обновлению проекта для Visual Studio
Introduction to projects and solutions
Applies to: ![]() Visual Studio
Visual Studio ![]() Visual Studio for Mac
Visual Studio for Mac ![]() Visual Studio Code
Visual Studio Code
This introductory article explores what it means to create a solution and a project in Visual Studio. A solution is a container to organize one or more related code projects, like a class library project and a corresponding test project.
As an educational exercise to understand the concept of a project, you’ll construct a solution and project from scratch. Ordinarily, you’d use Visual Studio project templates to create new projects. You’ll also look at the properties of a project and some of the files it can contain, and create a reference from one project to another.
Developing apps in Visual Studio doesn’t require solutions and projects. You can just open a folder that contains code and start coding, building, and debugging. For example, a cloned GitHub repo might not contain Visual Studio projects and solutions. For more information, see Develop code in Visual Studio without projects or solutions.
If you haven’t already installed Visual Studio 2019, go to the Visual Studio downloads page to install it for free.
If you haven’t already installed Visual Studio, go to the Visual Studio downloads page to install it for free.
Solutions and projects
In Visual Studio, a solution isn’t an «answer». A solution is simply a container Visual Studio uses to organize one or more related projects. When you open a solution, Visual Studio automatically loads all the projects that the solution contains.
Create a solution
Start your exploration by creating an empty solution. After you get to know Visual Studio, you probably won’t create empty solutions often. When you create a new project, Visual Studio automatically creates a solution for the project unless a solution is already open.
- Open Visual Studio.
- On the start window, select Create a new project.
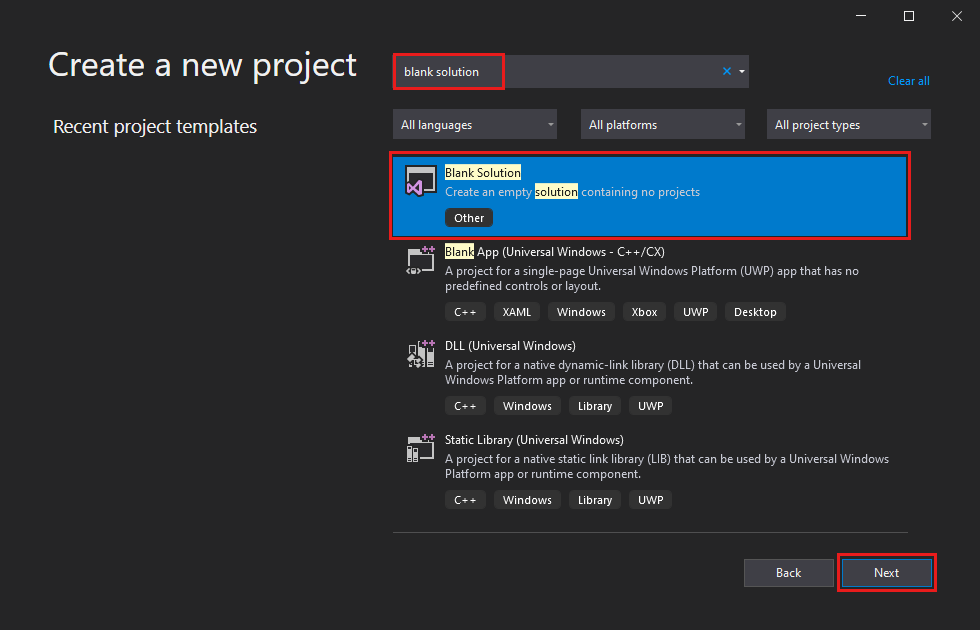
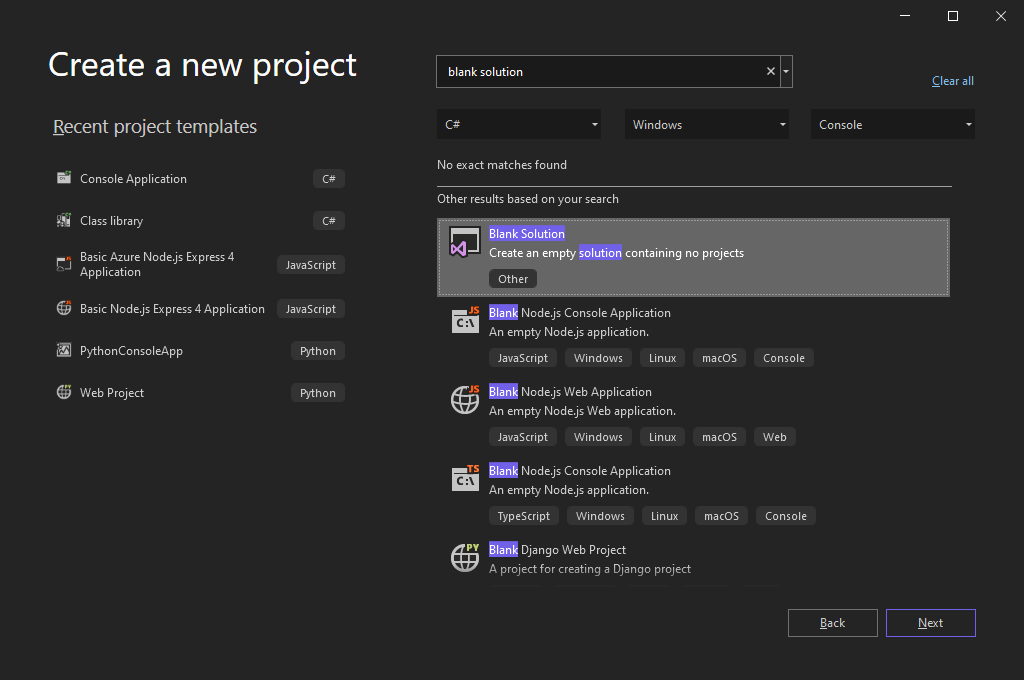
- On the Create a new project page, enter blank solution into the search box, select the Blank Solution template, and then select Next.
Tip If you have several workloads installed, the Blank Solution template might not appear at the top of your list of search results. Try scrolling to the Other results based on your search section of the list. It should appear there.
- Open Visual Studio, and on the start window, select Create a new project.
- On the Create a new project page, type blank solution into the search box, select the Blank Solution template, and then select Next.
Tip If you have several workloads installed, the Blank Solution template might not appear at the top of your list of search results. Try scrolling through Other results based on your search to find the template.
Add a project
Now add your first project to the solution. Start with an empty project, and add the items you need.
- From the right-click or context menu of Solution ‘QuickSolution’ in Solution Explorer, select Add >New Project. A dialog box opens that says Add a new project.
- Enter the text empty into the search box at the top, and then select C# under Language.
- Select the Empty Project (.NET Framework) template, and then select Next.
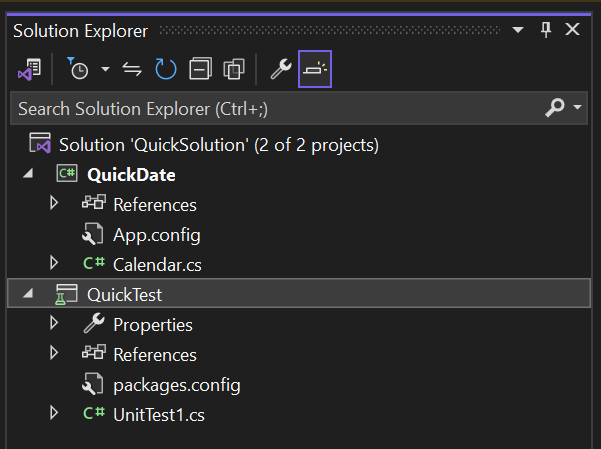
- Name the project QuickDate, then select Create. A project named QuickDate appears beneath the solution in Solution Explorer. Currently it contains a single file called App.config.
Note If you don’t see the Empty Project (.NET Framework) template, you must install the .NET desktop development Visual Studio workload. Visual Studio uses workload-based installation to install only the components you need for the type of development you do. An easy way to install a new workload when you’re creating a new project is to select the Install more tools and features link under the text that says Not finding what you’re looking for?. After Visual Studio Installer launches, select the .NET desktop development workload and then the Modify button.
- Right-click Solution ‘QuickSolution’ in Solution Explorer, and select Add >New Project from the context menu.
- On the Add a new project page, type empty into the search box at the top, and select C# under All languages.
- Select the C# Empty Project (.NET Framework) template, and then select Next.

Note Visual Studio uses workload-based installation to install only the components you need for the type of development you do. If you don’t see the Empty Project (.NET Framework) template, you need to install the .NET desktop development Visual Studio workload. An easy way to install a new workload when you’re creating a new project is to select the Install more tools and features link under the text that says Not finding what you’re looking for?. In the Visual Studio Installer, select the .NET desktop development workload, and then select Modify.
Add an item to the project
Add a code file to your empty project.
- From the right-click or context menu of the QuickDate project in Solution Explorer, select Add >New Item. The Add New Item dialog box opens. Select Show All Templates if dialog opens in compact view.
- Expand Visual C# Items, and then select Code. In the middle pane, select the Class item template. Under Name, type Calendar, and then select Add. Visual Studio adds a file named Calendar.cs to the project. The .cs on the end is the file extension for C# code files. The Calendar.cs file appears in the Solution Explorer visual project hierarchy, and the file opens in the editor.
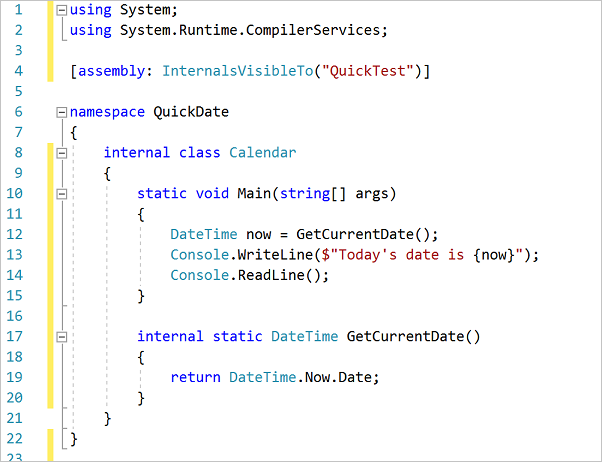
- Replace the contents of the Calendar.cs file with the following code:
using System; namespace QuickDate < internal class Calendar < static void Main(string[] args) < DateTime now = GetCurrentDate(); Console.WriteLine($"Today's date is "); Console.ReadLine(); > internal static DateTime GetCurrentDate() < return DateTime.Now.Date; >> > Add a second project
Solutions commonly contain more than one project, and these projects often reference each other. Some projects in a solution might be class libraries, some might be executable applications, and some might be unit test projects or websites.
To add a unit test project to your solution, start from a project template so you don’t have to add another code file to the project.
- From the right-click or context menu of Solution ‘QuickSolution’ in Solution Explorer, select Add >New Project.
- In the Add a new project dialog box, enter the text unit test into the search box at the top, and then select C# under Language.
- Select the Unit Test Project project template for .NET Core, and then select Next.
Note Starting in Visual Studio 2019 version 16.9, the MSTest project template name changed from MSTest Unit Test Project (.NET Core) to Unit Test Project. Several steps in the project creation changed in this update.

- From the right-click or context menu of Solution ‘QuickSolution’ in Solution Explorer, select Add >New Project.
- In the Add a new project dialog box, type unit test into the search box at the top, and then select C# under All languages.
- Select the C# Unit Test Project (.NET Framework) project template, and then select Next.
- On the Configure your new project page, name the project QuickTest, and then select Create. Visual Studio adds the QuickTest project to Solution Explorer, and the UnitTest1.cs file opens in the editor.
Add a project reference
You’ll use the new unit test project to test your method in the QuickDate project, so you need to add a reference to QuickDate to the QuickTest project. Adding the reference creates a build dependency between the two projects, meaning that when you build the solution, QuickDate builds before QuickTest.
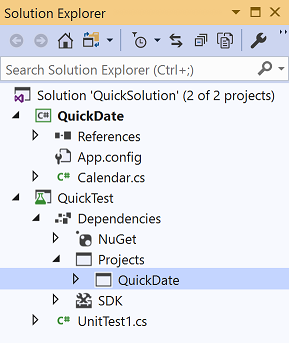
- Select the Dependencies node in the QuickTest project, and from the right-click or context menu, select Add Project Reference. The Reference Manager dialog box opens.
- In the left pane, expand Projects, and then select Solution. In the middle pane, select the checkbox next to QuickDate, and then select OK. A reference to the QuickDate project is added.
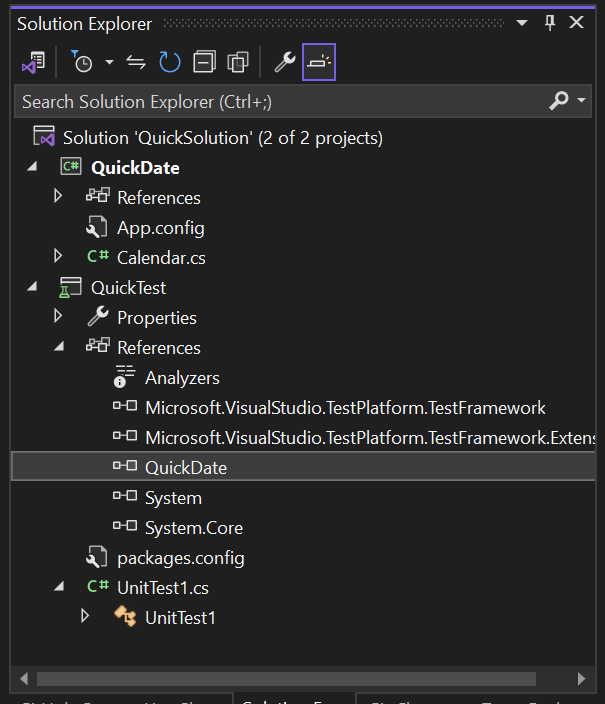
- In Solution Explorer, right-click the References node of the QuickTest project, and select Add Reference from the context menu.
- In the Reference Manager dialog box, select Projects. In the middle pane, select the checkbox next to QuickDate, and then select OK. A reference to the QuickDate project appears under the QuickTest project in Solution Explorer.
Add test code
- Now add test code to the C# test code file. Replace the contents of UnitTest1.cs with the following code:
using System; using Microsoft.VisualStudio.TestTools.UnitTesting; namespace QuickTest < [TestClass] public class UnitTest1 < [TestMethod] public void TestGetCurrentDate() < Assert.AreEqual(DateTime.Now.Date, QuickDate.Calendar.GetCurrentDate()); >> > using System.Runtime.CompilerServices; [assembly: InternalsVisibleTo("QuickTest")] The Calendar.cs code should look like this screenshot:

Run the unit test
To check that your unit test is working, choose Test > Run All Tests from the menu bar. The Test Explorer window opens, and you should see that the TestGetCurrentDate test passes.
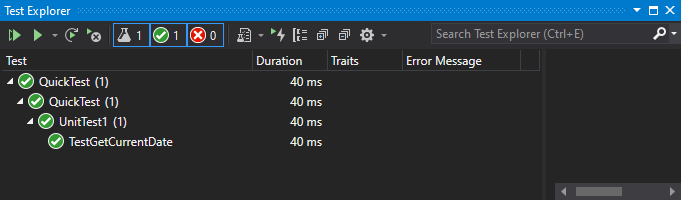
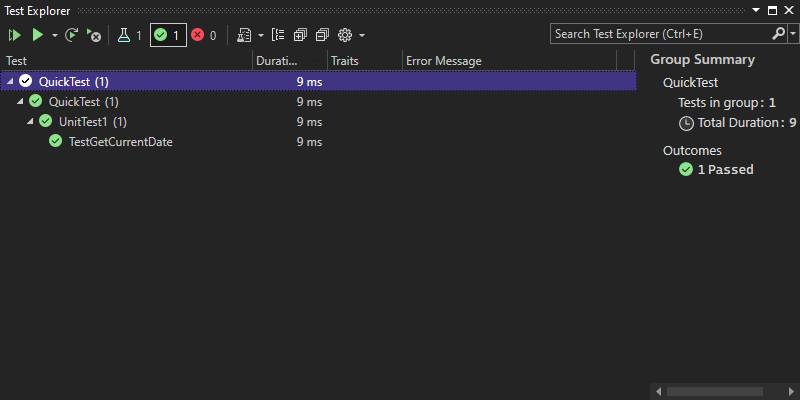
You can also open Test Explorer by choosing Test > Test Explorer from the menu bar.
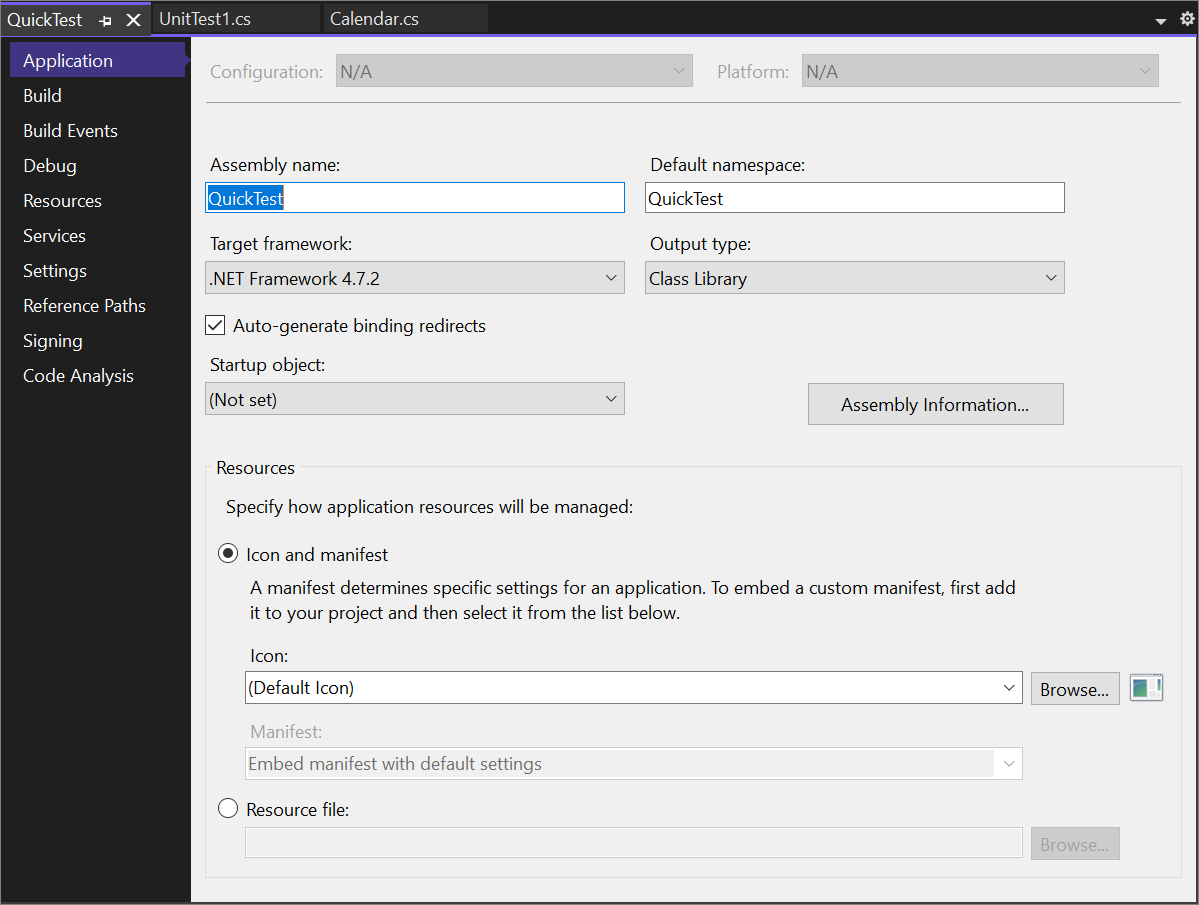
Project properties
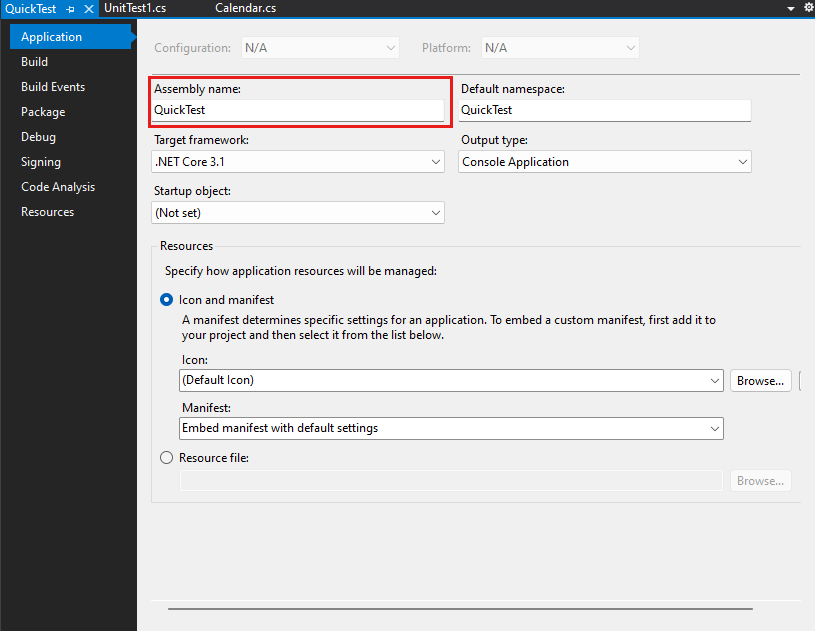
The line in the Calendar.cs file that contains the InternalsVisibleToAttribute attribute references the assembly name or file name of the QuickTest project. The assembly name might not always be the same as the project name. To find the assembly name of a project, use the project properties. The property pages contain various settings for the project.
-
In Solution Explorer, right-click the QuickTest project and select Properties, or select the project and press Alt+Enter. The property pages for the project open to the Application tab. The Assembly name of the QuickTest project is indeed QuickTest. If you want, you can change the name here. When you build the test project, the name of the resulting binary file then changes from QuickTest.dll to .dll.
See also
- Work with projects and solutions
- Develop code in Visual Studio without projects or solutions
- Manage project and solution properties
- Manage references in a project