[Fixed] VLC Keeps Crashing on Windows 10/11, Mac, Android, etc.
The VLC crashing issue can happen on macOS, Windows, Android, and other platforms when playing MKV, 4K, HEVC, and other file formats. If you encounter the following problems, maybe your VLC will crash.
Symptoms of VLC Crashing:
- 1. VLC stops playing video at a certain point.
- 2. VLC quits unexpectedly during video playback on Mac and Windows.
- 3. VLC Media Player keeps stopping/shutting down halfway.
- 4. VLC doesn’t respond or open on Windows 10/11.
- 5. Video freezes during playback on VLC Media Player.
- 6. The device screen flashes black, grey, or green suddenly.
- 7. The screen shows different logical errors and prompts.
VLC Media Player keeps crashing for more than one reason, the most common of which is that the player registry files are damaged or deleted, VLC is outdated, or VLC settings are improper. Read the guide to learn what you can do to prevent VLC Media Player from crashing on Windows, Mac, Android, and other platforms.
Does VLC Keep Crashing Playing 4K Videos? Convert 4K to 1080p
If your 4K video is encoded in HEVC codec, the VLC crashing problem happens in high possibility. You can convert 4K HEVC to 1080p H.264 to smoothen the VLC video playback with WinX Video Converter – a 4K video converter you can also use to convert between formats.
- Convert videos from/to HEVC, H.264, MP4, MOV, AVI, etc. for VLC.
- Compress 4K/2K/HD HEVC to smaller size and convert 4K to 1080p.
- GPU-accelerated HD/4K video converter & player. 47X faster. High quality.
Free Download For Win 7 or later
Free Download for Mac OS X 10.6 or later
Table of Contents
- Part 1. Why Is VLC Crashing?
- Part 2. How to Solve VLC Keeps Crashing?
Part 1. Why Is VLC Crashing?
As said, most of the time, the VLC crashing problem is caused by damaged registry files, outdated VLC, or improper VLC settings. It’s also possible that your VLC Media Player isn’t loaded properly or that you’re attempting to open an incompatible or high-res video. All in all, the following words are about the reasons for VLC Player crashing issue.
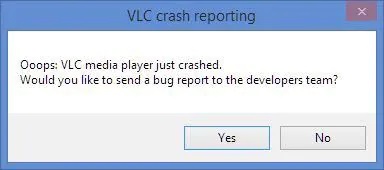
- The VLC Media Player was probably compromised.
- The file format may be not supported by VLC.
- There is not enough space in your system to play an HD or 4K video.
- It’s possible that the drivers on your computer are out-of-date.
- The playback settings in VLC may not be working properly.
- The VLC component may be blocked by your system’s firmware or by any other security application or setting.
Part 2. How to Solve VLC Keeps Crashing on Windows 10/11, Mac, Android, etc.?
Now that you know the reasons casuing VLC crashing error, you can try the following methods to fix the issue and then enjoy your video files with VLC Media Player.
Solution 1. Update VLC to the latest version
Open the VLC media player on your device, click on Help > Check for Updates, download the new version if available, and install it following the popping up instructions. Relaunch the VLC player on your device and load a video to test.
Solution 2. Disable VLC hardware acceleration
Open VLC media player. Click on Tools > Preferences > Input/Codecs, you should see Hardware-accelerated decoding, click the drop-down icon, select Disable to disable hardware-accelerated decoding. Go back to the main interface of VLC, select a video to play to check if the VLC crashing issue is resolved.
Solution 3. Uninstall and Re-install VLC Media Player
VLC crashing problems can be caused by corrupted VLC installer files or program bugs. Uninstall the current VLC, restart your device, and re-install it later on your computer. Steps vary on different platforms. But it’s easy to do this even for novice users.
Solution 4. Disable Pre-load MKV files in the same directory
Sometimes VLC keeps crashing when playing MKV files. Try to disable the pre-load MKV files option on VLC Media Player. To do so, open VLC, click on Tools > Preferences > Shows Settings > All > Input/Codecs > Demuxers > Matroska > Codecs Settings, uncheck Pre-load MKV files in the same directory, and click the Save button to save the changes.
Solution 5. Set FFmpeg Decoding Threads to 2
Run VLC media player as an administrator, select Tools > Preferences > All > Show Settings > Input/Codecs > Video Codecs > FFmpeg, under Decoding, locate the Threads entry, set the value of Threads to 2, click the save button to save the settings. Restart the VLC player and open a video to test if it fixes the VLC crashing problem.
Solution 6. Enable DirectX Video Acceleration (DVXA) 2.0
Open VLC media player and choose Run as Administrator. Head to Tools > Preferences > Input/Codecs category > Codecs, change the Hardware-accelerated decoding to DirectX Video Acceleration (DvXA) 2.0. Restart VLC video player. Now, VLC should play video without crashing problem.
Solution 7. Convert Incompatible or High-res Video to VLC-supported One
If the file format is not supported by VLC Media Player, the VLC crashing problem happens. Also, VLC gets choppy when playing 4K videos. Therefore, you are highly suggested to convert videos for VLC, e.g. MKV to MP4 and HEVC to H.264 to make the video playable.
The tool you can use is WinX Video Converter — a free 4K video converter that can convert videos to any format supported by VLC, and change 4K to 1080p resolution to smoothen the video playback.
Step 1. Free download WinX Video Converter, install and launch it on your computer.
Free Download For Win 7 or later
Free Download for Mac OS X 10.6 or later
Step 2. Click on the +Video button to add the video you want to convert to VLC-supported format or resolution.
Step 3. When the Output Profile window pops up, choose an output format. Of course, MP4 (aac+h.264) is the recommended one as it is the most widely supported format.
Step 4. To change the video resolution or codec, you can click the Settings icon to find the options.
Step 5. When everything is done, simply hit the RUN button to start converting your video to VLC playable format.
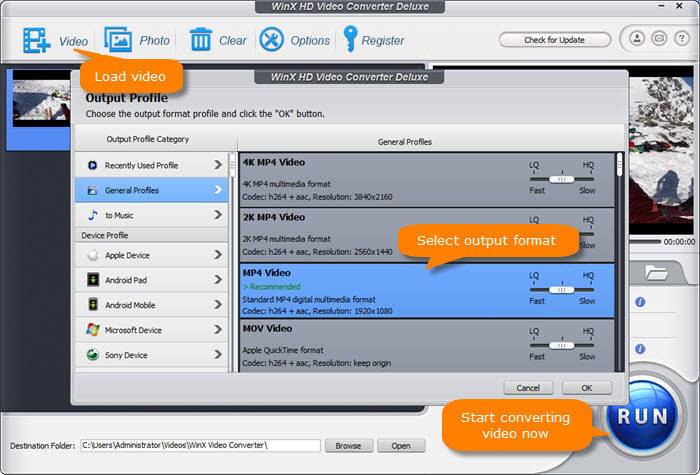
Step 6. After that, play your video with VLC Media Player without VLC crashing issue.
Solution 7. Other Possible Ways to Fix VLC Crashing Problem
- Increase the value of File caching (ms) to 1000 or higher.
- Set the Skip the loop filter for H.264 decoding to All.
- Set the field to OpenGL video output under the Video Output section. All this can be done under Preference settings.
- Force quit VLC Media Player on your device.
In conclusion:
VLC keeps crashing is an issue frequently happen in daily life. By using the above ways, most users have resolved the issue perfectly. If the methods don’t work for your error, you may have to switch to another media player to play videos without crashing problem.
Other Useful How-to Guides
What to Do when VLC Is Unable to Open MRL
The VLC is unable to open MRL file with prefixes ‘dvd:///d:/’,’rtsp://[file name]’, ‘https://[file name]’. Learn how to fix it.
How to Fix VLC Subtitles Not Working
This article discusses why subtitles don’t work on VLC Media Player and how to fix the problem.
How to Fix VLC Playing Video without Sound Problem
VLC player is not giving any sound when other applications are working fine to play an MP4 video, tried reinstalling VLC but it did not work. What could be the perfect solutions for this?
Does VLC Support Xvid Codec? How to Play Xvid Files on VLC?
Does VLC Media Player support Xvid codec? How can you play Xvid files correctly on VLC? In this video, we’ll take a look at how to play Xvid files easily on VLC.
ABOUT THE AUTHOR

Kaley Torres 
Kaley Torres is a self-motivated, creative editor with eight years of marketing and SEO experience, specializing in writing on DVD, video, audio, images, new digital contents etc. With a partiality DVD collection, Kaley also enjoys digitizing DVD and is keen to share her DVD video conversion solutions as well as video sharing tips on social media.
Home > Video > Play Video > VLC Keeps Crashing
Digiarty Software is a leading multimedia software provider, delivering easy-to-use and innovative multimedia solutions to users all over the world.
Product
- WinX DVD Ripper
- WinX Video Converter
- WinX DVD Copy
- WinX MediaTrans
Tips and Tricks
- DVD Backup Tips
- DVD Copy Guides
- Burn DVD
- Convert Video
- Data Transfer
- Tips and Glossary
How To Fix VLC Media Player Crashes when Playing .MKV Files
As it turns out, some users are unable to open .MKV files with VCL Media Player. A few seconds after opening the .mkv file, affected users get the ‘Oops: VLC media player just crashed’ error. Retrying the procedure brings about the same outcome, and most affected users are reporting that the issue occurs with any .MKV file that they attempt to play.
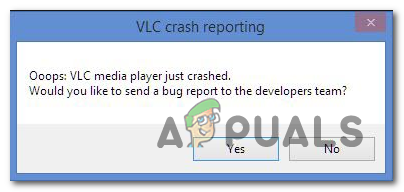
If you’re using an ancient version of VLC Media Player (the build is dated around 2012), the issue can most likely be fixed by uninstalling your current VLC version and migration towards the most recent release.
However, if you are encountering a period of lagging and skipping before your VLC player finally crashes, it’s possible that insufficient processing power is causing the ‘Oops: VLC media player just crashed’ error. In this case, you should try disabling hardware acceleration decoding, switching to DirectX video acceleration or boosting the default file caching value.
In case your machine should be more than capable of playing 4K .MKV files, you should also try forcing the application to skip the loop filter or even enable multi-thread decoding on FFmpeg playback for .MKV files.
Method 1: Installing the latest version of VLC Media Player
As it turns out, one of the most common causes that will cause this particular error when playing .MKV files with VLC Media Player is a bug that used to affect VLC versions released around 2012. If you’re using a severely outdated VLC client, the fix might be as simple as uninstalling your current version of VLC and installing the latest build from the official website.
Note: Keep in mind that the auto-updating feature on VLC is known to break quite often. So don’t dismiss this potential fix just because you haven’t been prompted to update by the application.
several affected users have confirmed that uninstalling their current VLC version via the Programs and Files menus and installing the latest build from the official download page has finally allowed them to fix the ‘Oops: VLC media player just crashed’ error’.
Here are step by step instructions through the whole thing:
- Ensure that every instance of VLC media player is completely closed.
- Pless Windows key + R to open up a Run dialog box. Inside the text box, type ‘appwiz.cpl’ and press Enter to open up the Programs and Features menu.
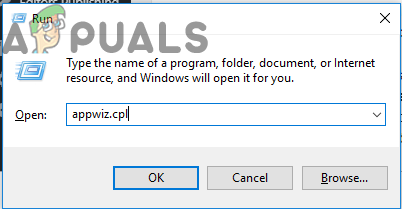 Note: If you’re prompted by the UAC (User Account Control) window to provide admin access, click on Yes to do so.
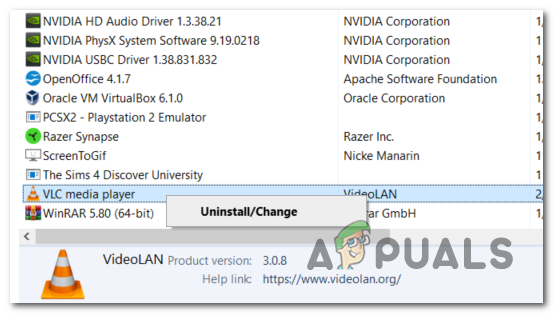
 - After you manage to get inside the Programs and Features menu, scroll down through the list of installed applications and locate your VLC Media Player installation. Once you manage to locate it, right-click on it and choose Uninstall/Change from the context menu.
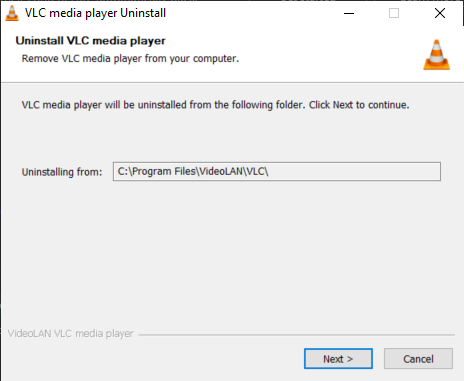
- Once you’re inside the uninstallation screen of VLC media player, follow the on-screen instructions to complete the operation, then restart your computer if you’re not prompted to do so automatically.
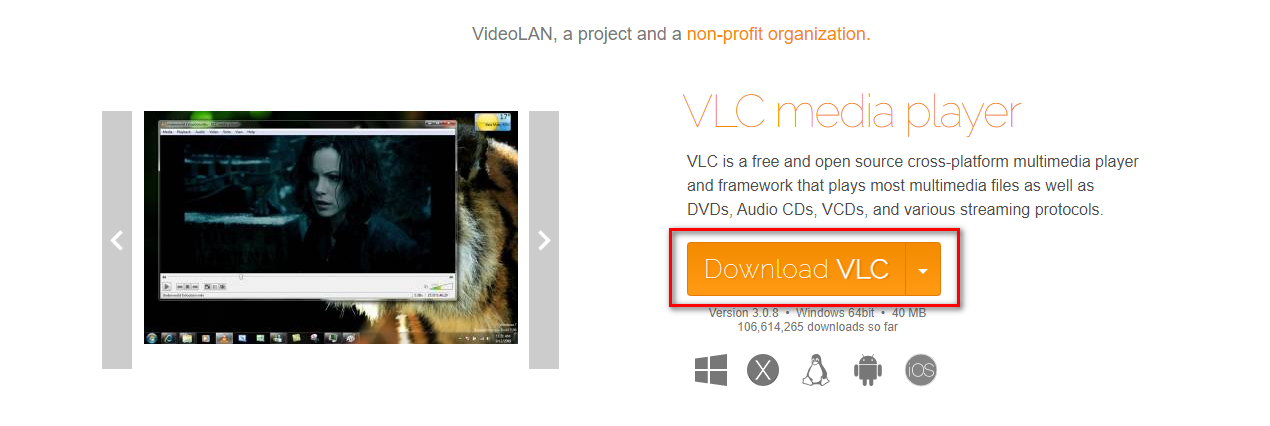
- Once the next startup sequence is complete, open this link (here) with your default web browser and click on the Download VLC button to download the latest version of the installation executable.
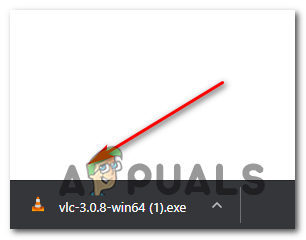
- Once the installation executable is completely downloaded, double-click on it and follow the on-screen instructions to complete the installation.
- After the process is complete, restart your computer and see if you are able to play .MKV files normally after the next machine startup.
In the event that you’re still struggling with frequent ‘Oops: VLC media player just crashed’ crashes when attempting to play .MKV files, move down to the potential fix below.
Method 2: Disable Hardware acceleration decoding
In case you’re only encountering skipping issues or general crashes on VLC when you attempt to play high-definition .MKV files by streaming them over a network, it’s most likely due to insufficient processing power on your computer.
This issue has been encountered by other users facing the problem in similar circumstances. The way they got this resolved was by disabling Hardware-accelerated decoding from the Preferences menu. This ends up easing the load off your CPU and GPU, making the loading times bigger but also making the application much more stable when running on low-spec machines.
Here’s a quick guide on disabling hardware acceleration on VLC media player:
- Open VLC media player with administrative privileges by right-clicking the launch icon and choosing Run as Administrator.
- Once you’re inside the main VLC window, use the ribbon bar at the top to access the Tools menu, then click on Preferences.
- When you get to the Simple Preferences screen, select the Input / Codecs category from the menu at the top, then move down to the Codecs tab and set the Hardware-accelerated decoding to Disabled.
- After you do this, click on the Save button once to make the change permanent.
- Restart VLC Media player and see if the issue is now resolved.
In case you’re still encountering frequent stuttering and crashing when you attempt to play .MKV files with VLC Media Player, move down to the next method below.
Method 3: Enabling DirectX Video Acceleration (DVXA) 2.0
If you’re encountering this issue on a newer PC configuration that runs with a fairly dedicated GPU, but with a low-tier CPU, changing the default hardware acceleration to Direct Video Acceleration (DCXA) 2.0 might be the method that finally fixes the constant VLC crashes when playing .MKV files.
This might be effective because DirectX Video Acceleration allows certain CPU-intensive tasks (iDCT, motion compensation, deinterlacing, etc.) that might cause stuttering, freezes or general instability to be offloaded to the GPU.
If you’re using a modest CPU, this operation might put the heavy rendering tasks on your GPU, which will allow your system to handle playing .MKV files much more efficiently.
Here’s a quick guide on enabling DirectX Video Acceleration (DVXA) 2.0 via the Input & Codecs Settings inside VLC’s Preferences menu:
- Start by opening up VLC Media Player with administrative privileges.
- Once you’re inside the application, use the ribbon menu at the top to bring up the Tools menu, then click on Preferences from the newly appeared drop-down menu.
- After you manage to get inside the Simple Preferences menu, select the Input / Codecs tab from the menu at the top.
- Next, scroll down to the Codecs section and change the Hardware-acceleration decoding using the associated drop-down menu to DirectX Video Acceleration (DvXA) 2.0.
- Click Save to confirm the change, then restart the VLC application and see if the problem is resolved the next time you attempt to play a .MKV file.
In case you’re still encountering general stuttering and crashes when playing .MKV files, move down to the next potential fix below.
Method 4: Boosting File caching
If you’re encountering several seconds of general stuttering after the application finally crashes, it’s most likely due to the fact that the application doesn’t have the time to do sufficient file caching. By default, VLC Media Player allocates 300 ms to File Caching, but this might not be sufficient for low-end PC configurations.
If this scenario is applicable, you should be able to resolve this issue by accessing the Advanced Preferences menu of VLC media player and boosting the File caching value 1000 or above. Several affected users that were also encountering this issue have confirmed that this operation has finally allowed them to play .MKV files on VLC without issues.
Here’s what you need to do in order to boost File Caching to a higher value:
- Open VLC Media Player with administrative privileges.
- Once you’re inside, use the ribbon at the top to click on Tools, then click on Preferences from the drop-down menu that just appeared.
- After you manage to get inside the Simple Preferences menu, change the Show Settings toggle in the top-left corner from Simple to All.
- After you do this, the menu will change accordingly. From the new interface, use the left-hand side menu to select Input / Codecs.
- With the Input / Codecs menu selected, move over to the right-hand side menu and change the value associated with File caching (ms) to 1000.
- Click Apply to save the changes, then restart VLC Media Player and see if the problem has been resolved.
If you’re still encountering the ‘Oops: VLC media player just crashed’ error when you attempt to play .MKV files, move down to the next potential fix below.
Method 5: Skipping the loop filter
As it turns out, the issue can also be caused by a loop filter that is used before the H 264 decoding begins. This operation is mainly enforced in order to reduce blocking artifacts without reducing the sharpness of the picture. But in certain circumstances, an in-loop filter can effectively stop your VLC installation ability to play certain MKV files.
In case you’re only encountering this issue with a few .MKV files (some .MKV files play just fine), you might be able to get the issue resolved by accessing the FFmpeg audio/video decoder settings and force the loop filter to be skipped for every instance of H.264 decoding.
Here’s a quick guide on configuring your VLC Media Player installation to skip the loop filter:
- First things first, ensure that VLC Media Player is opened with administrative privileges. You can do this by right-clicking on the launch executable and choose Run as Administrator from the context menu.
- Next, use the ribbon bar at the top to expand the Tools category, then click on Preferences from the drop-down menu.
- Once you’re inside the Simple Preferences menu, switch the Show Settings toggle (bottom-left corner) to All in order to view the advanced settings menu.
- After the Advanced Preferences menu becomes visible, use the left-hand side menu to expand the drop-down menu associated with Video Codecs.
- As soon as you do this, select FFmpeg from the list of video codex that appeared below, then move over to the right-hand section.
- Inside the FFmpeg audio/video decoder, navigate to the Decoding sub-menu and set the drop-down menu associated with Skip the loop filter for H.264 decoding to All.
- Save the modification by clicking on Save, then restart your application and see if the operation is a success.
In case you’re still encountering the ‘Oops: VLC media player just crashed’ error when attempting to play .MKV files using VLC Media player, move down to the next potential fix below.
Method 6: Forcing multi-thread decoding on FFmpeg playback
If you’re encountering a lot of general stuttering and lag before finally experiencing the ‘Oops: VLC media player just crashed’ error when attempting to play .MKV files that are exceptionally large.
As it turns out, VLC Media Player is configured by default to be as lightweight as possible with the system resources that it’s using – However, this is not necessarily a good thing when having to deal with 4K .MKV files.
If this scenario is applicable, you should be able to get the issue fixed by ensuring that FFmpeg audio and video decoding is done with multi-threading (hyper-threading).
Here’s a quick guide on forcing multi-thread decoding on FFmpeg playback:
- Open VLC Media Player with administrative privileges. When you are prompted by the User Account Control (UAC), click on Yes to grant admin access.
- Once VLC Media Player opens successfully, use the ribbon menu at the top to select Tools > Preferences.
- By default, you will see the Simple Preferences screen. Te changes it to the Advanced Preferences menu, set the Show Settings toggle (bottom-left corner) to All.
- As soon as the Advanced Preferences menu becomes visible, use the left-hand section to select Input / Codecs menu.
- Then, expand the Video codecs drop-down menu below and select the FFmpeg entry from the list of available subitems.
- With the FFmpeg entry selected, move over to the right-hand side section and locate the Threads entry under Decoding.
- Change the value of Threads to 2, then click on Save to enforce the change.
- Restart your VLC Media Player application and see if the issue is now resolved.
VLC Media Player тормозит при проигрывании — что делать

Притормаживание некоторых видеофайлов с одна из распространенных проблем VLC Media Player. Разберемся, почему при воспроизведении в плеере VLC 4k тормозит изображение и попробуем исправить это.
Решение проблем в работе VLC Media Player
Помимо эффекта торможения при воспроизведении видеозаписей высокого качества, пользователи сталкивались с другими неполадками в работе VLC Media Player. Существуют способы устранить их, причем практически любую проблему можно решить через настройки плеера.
Торможение при проигрывании
Наиболее частый случай. Причиной, по которой в VLC тормозит видео, обычно являются слабые характеристики компьютера. Особенно ярко проблема проявляется при просмотре роликов в высоком разрешении.
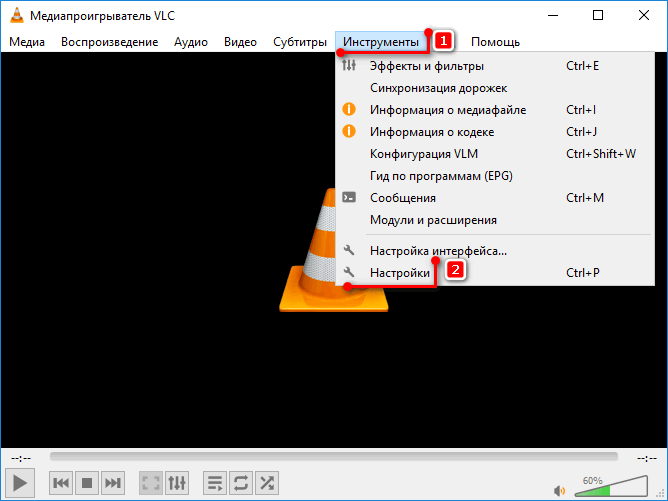
- Запускаем ВЛС проигрыватель, открываем вкладку «Инструменты» и заходим в «Настройки».
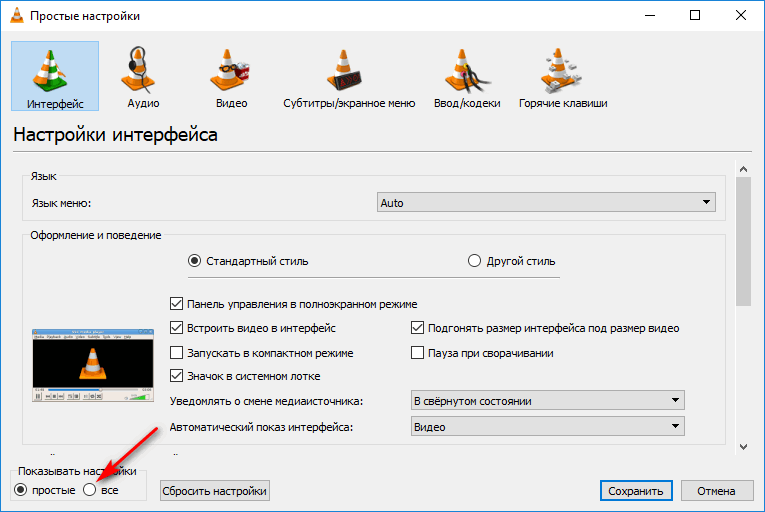
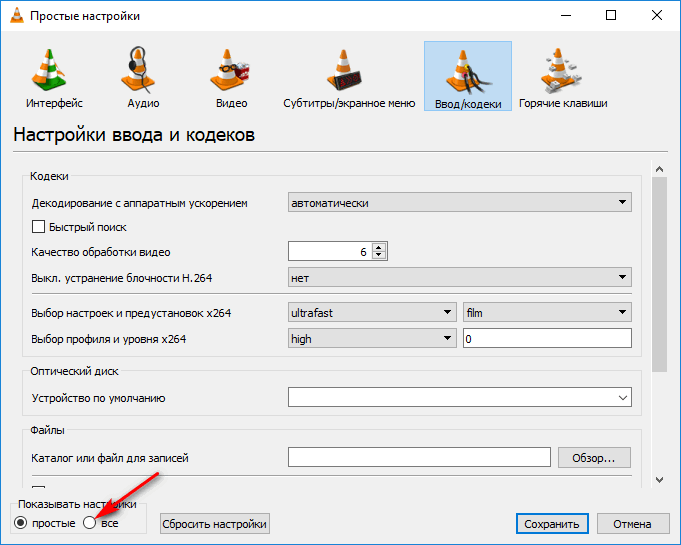
- В левом нижнем углу выбираем показывать все настройки.
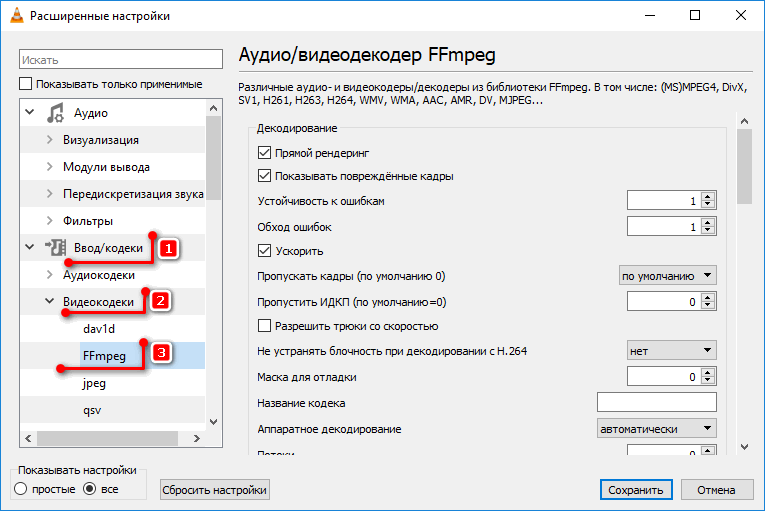
- Переходим к блоку «Ввод/Кодеки», открываем вкладку «Видеокодеки» и выбираем «ffmpeg».
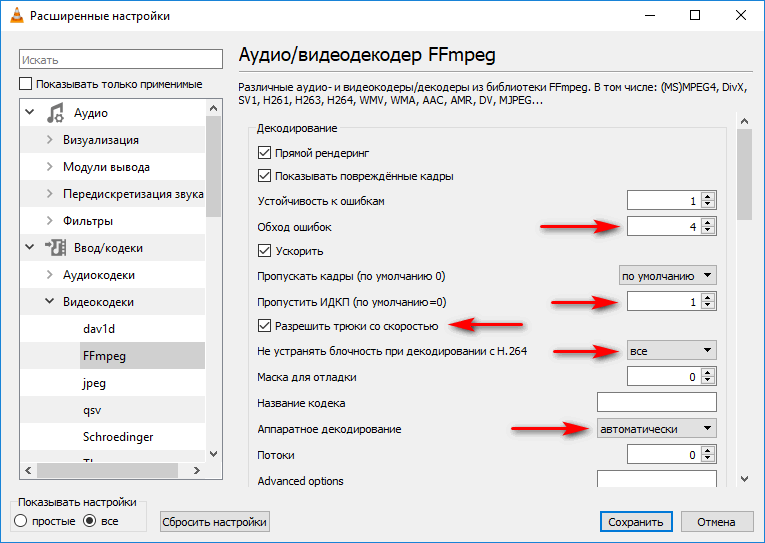
- В блоке «Декодирование» выставляем параметры так, как показано на скриншоте.
- Переходим в блок «Видео», настраиваем так, как показано на следующем скриншоте и нажимаем «Сохранить». Теперь можно запустить видеоролик.
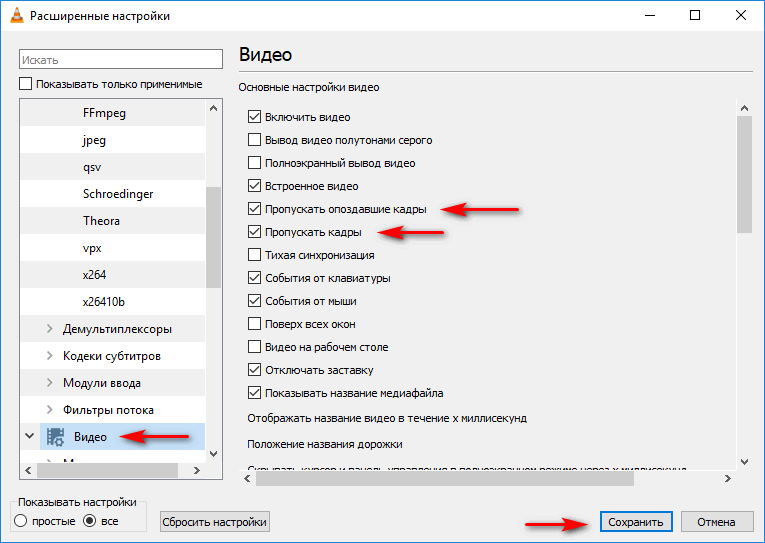
После перенастройки изображение потеряет в качестве, но эти изменения не сильно будут заметны. При этом и звук и картинка будут полностью синхронизированы.
Зеленый экран
Появление зеленого экрана во время просмотра видео – серьезная проблема, и существует три способа ее решения. Первый способ:
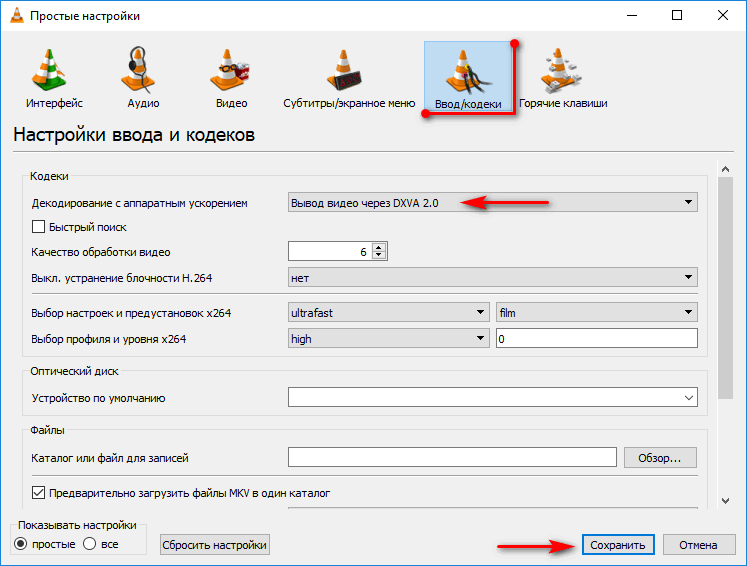
- Открываем вкладку «Инструменты» и заходим в «Настройки».
- Переходим во вкладку «Ввод/Кодеки» и в поле «Декодирование с аппаратным ускорением» выбираем «Вывод видео через DXVA 2.0». Теперь нажимаем «Сохранить» и пробуем снова запустить видеоролик.
Иногда помогает отключение декодирования с аппаратным ускорением. Если этот метод не принес результатов, можно попробовать увеличить объем кэша для локальных файлов. Второй способ:
- Открываем вкладку «Инструменты» и заходим в «Настройки».
- В правом нижнем углу ставим галочку, чтобы показать все настройки.
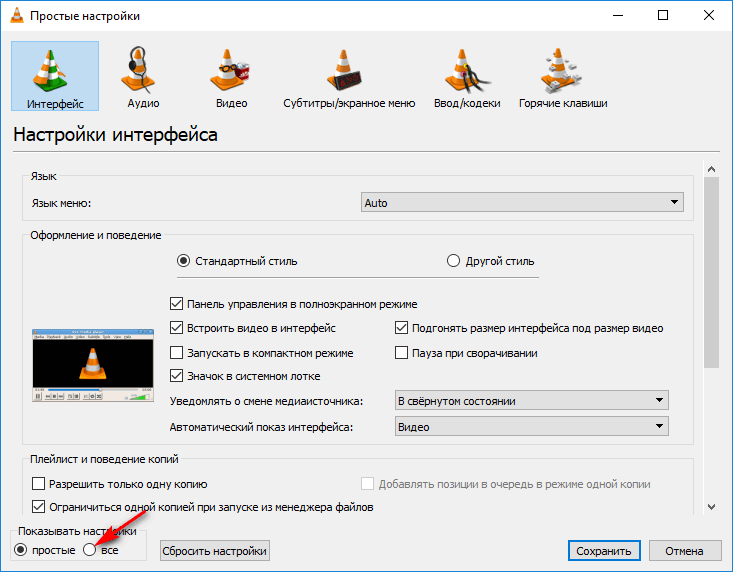
- В поле слева открываем вкладку «Ввод/Кодеки», настройки справа прокручиваем до блока «Дополнительно», увеличиваем кэш до 1000 (мс) и нажимаем «Сохранить».
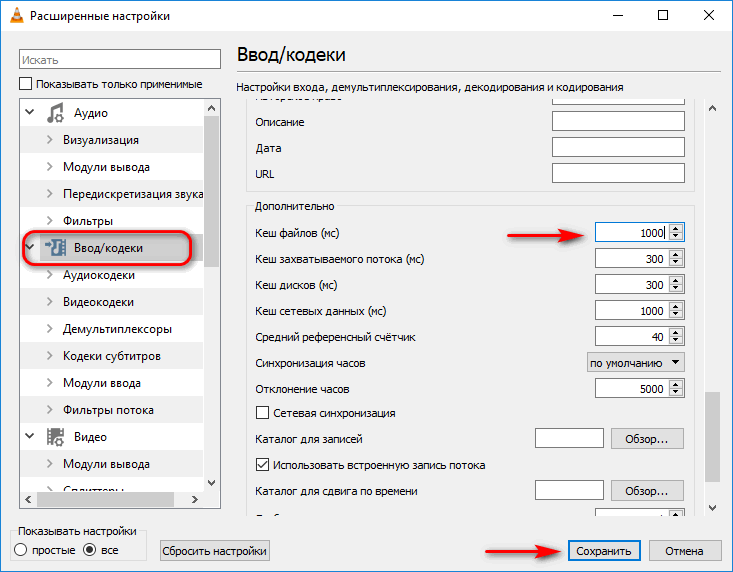
Метод увеличения кэша чаще остальных помогает устранить зеленый цвет во время проигрывания видео. Но всегда можно попробовать новую настройку. Способ третий:
- Заходим в «Инструменты», а затем в «Настройки».
- Открываем все настройки.
- Во вкладке «Ввод/Кодеки», заходим в раздел «Видеокодеки» и выбираем набор библиотек «ffmpeg». В поле справа напротив пункта «Не устранять блочность при декодировании с H.264» выбираем «Все» и нажимаем «Сохранить».
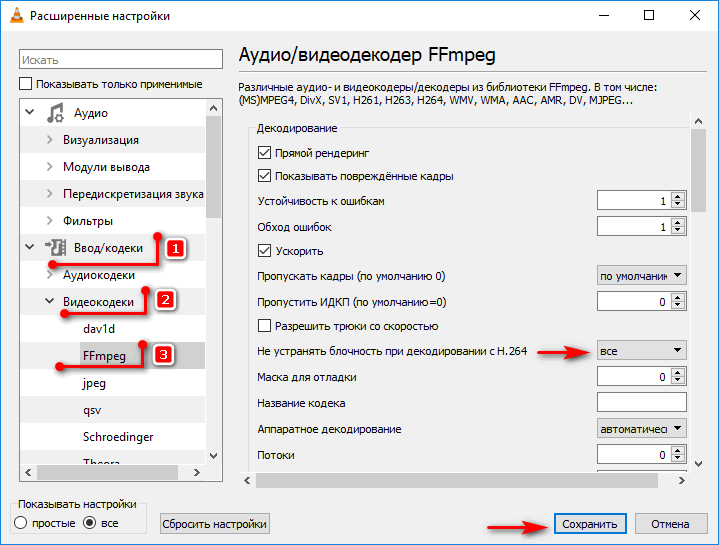
Способы устранения зеленого экрана, указанные выше, могут быть применимы и в случае, если видео виснет или скачет при проигрывании.
Проблема с запуском VLC плеера
Бывает, что при попытке воспроизвести файл на экране появляется окошко с сообщением: «VLC Media Player just crashed». Исправить эту ошибку можно попробовать следующим образом:
- Запускаем проигрыватель, заходим во вкладку «Инструменты» и открываем «Настройки».
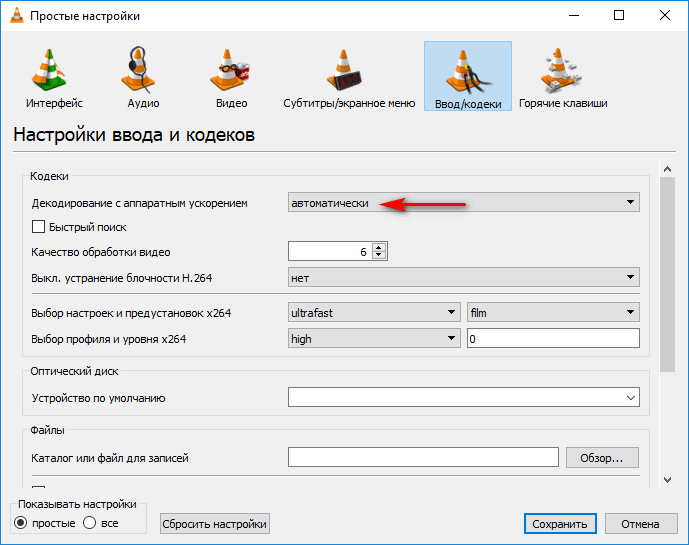
- Переходим в раздел «Ввод/кодеки», напротив пункта «Декодирование с аппаратным ускорением» ставим «автоматически».
- Снова входим в настройки, во вкладке «Видео» напротив пункта «Вывод» ставим «Вывод видео через OpenGL для Windows» и нажимаем «Сохранить».
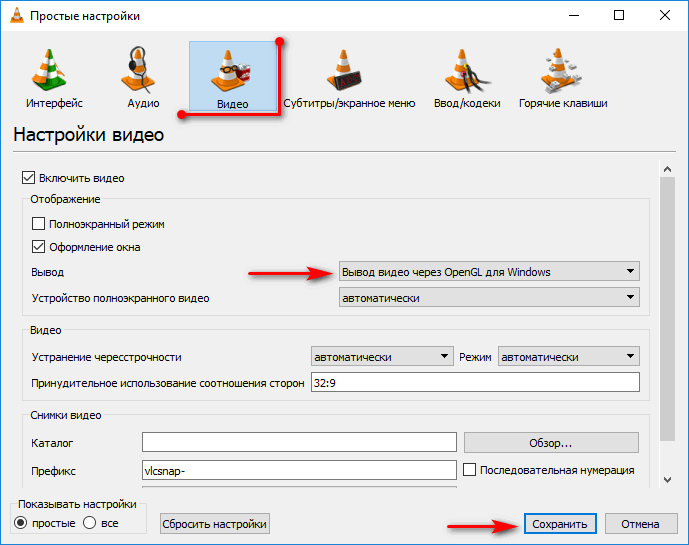
Теперь пробуем запустить видеоролик. Если его снова воспроизвести нельзя, а та же ошибка повторяется с другими файлами, может помочь обновление проигрывателя.
Двойная картинка
Иногда при просмотре видеоконтента на экране дублируется изображение. Такой эффект называют стереопарой. Она состоит из двух плоских кадров, которые вместе должны создавать объемное изображение. Обычно эффект появляется, когда пользователь на ВЛС плеере пытается воспроизвести 3D-фильм. Тем не менее двойное изображение можно убрать.
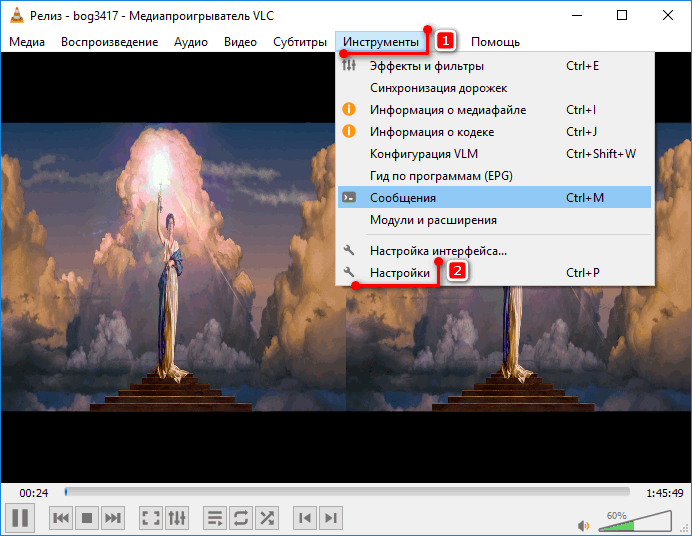
- Запускаем VLC Media Player, открываем вкладку «Инструменты» и заходим в «Настройки».
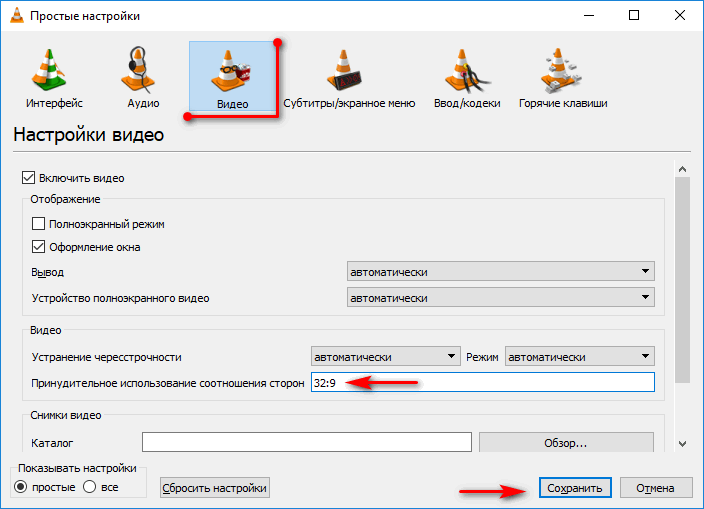
- Входим во вкладку «Видео», в поле «Принудительное использование соотношения сторон» вводим значение, указанное на скриншоте, затем нажимаем «Сохранить» и закрываем ВЛС Плеер.
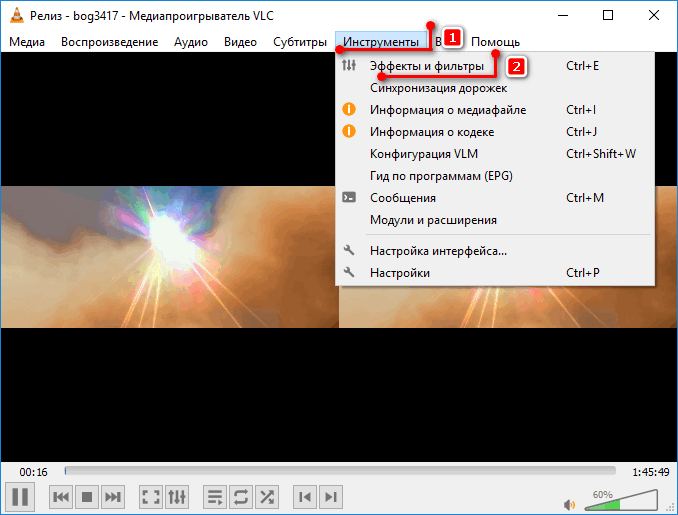
- Снова запускаем фильм, открываем вкладку «Инструменты» и входим в «Эффекты и фильтры».
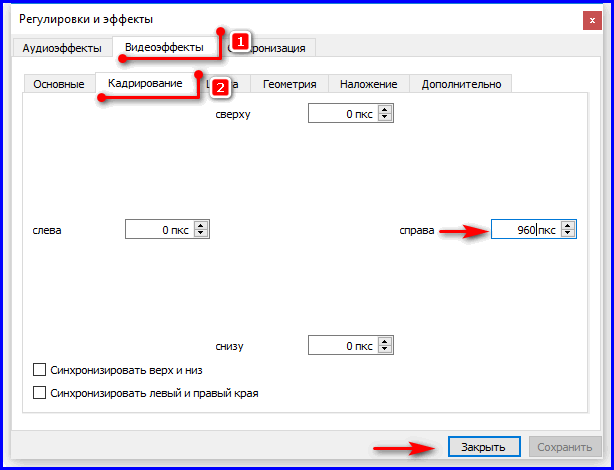
- Во вкладке «Видеоэффекты» открываем раздел «Кадрирование» и в поле справа вводим значение, указанное на скриншоте. Теперь двойное изображение должно исчезнуть.
Другие проблемы
Существуют и другие проблемы, с которыми пользователи могут столкнуться:
- Потеря панели управления. Если исчезли кнопки управления следует сбросить настройки плеера.
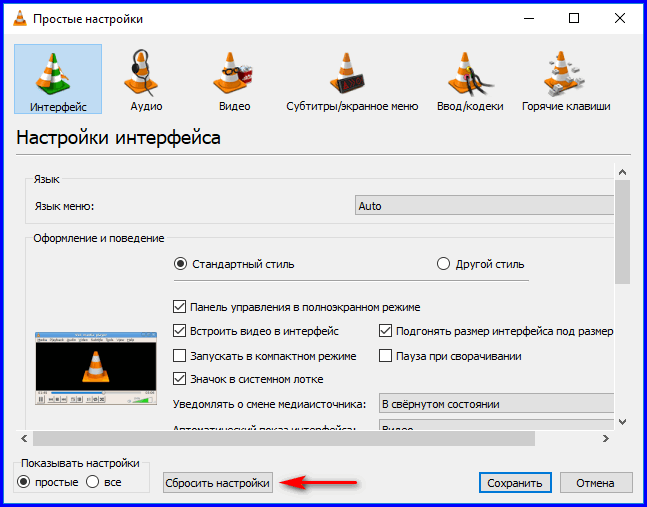
- Плеер не переключает каналы. Возможно дело в плейлисте. Решить проблему можно загрузкой другого файла.
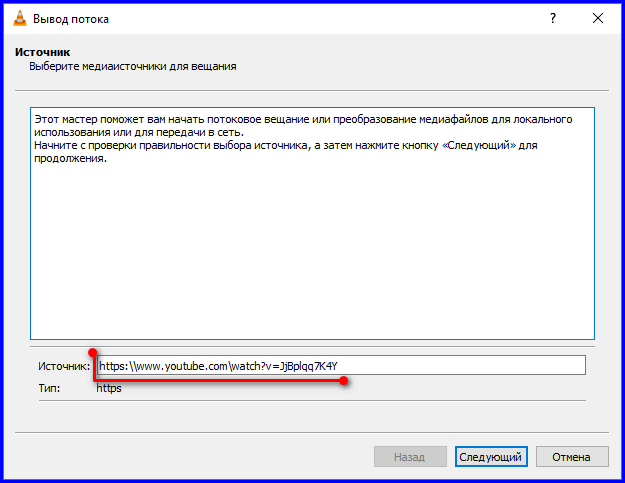
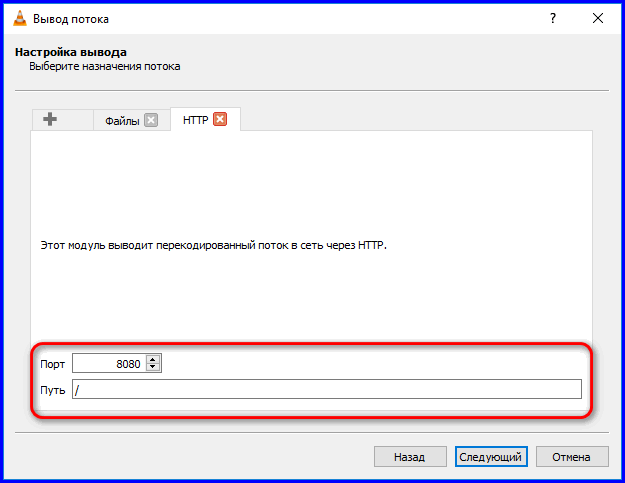
- Проблемы с открытием сетевых потоков. Во время организации потокового вещания может появится сообщение о том, что в VLC этот источник не открывается. Нужно проверить что все данные (адрес источника, путь и порт) указаны верно. Затем попробовать обновить плеер. Но часто вещание блокирует одно из приложений, контролирующих доступ в интернет. Например, брандмауэр Windows или файрвол антивируса.
Риск столкнуться с той или иной проблемой снижается по мере выпуска обновлений. Плеер последней версии редко притормаживает или зависает, практически не транслирует картинку в зеленом цвете и охотнее открывает любые источники. Поэтому, если по какой-то причине не работает VLC Media Player или он некорректно выполняет некоторые задачи, то в первую очередь следует убедиться, что он полностью обновлен.
vlc media player just crashed. Do you want to send a bug report to the developers team. что делать? когда открываю
Другой плеер, может видео поврежденное. Или кодеки обновить (K-Lite использовать, например, если windows).
Алёна АлёнаУченик (62) 8 лет назад
можно расшифровать? я ничего не поняла
Aljebro Просветленный (27070) Что непонятного, в том, чтобы использовать другой плеер? Тот же media player classic (вроде) от K-Lite. https://ru.wikipedia.org/wiki/K-Lite_Codec_Pack оф. сайт там указан.
NicholasПрофи (686) 3 года назад
Кодеки у МДС свои и он не зависит от установленных на компе кодеков.
Поставь предыдущую версию (32-64bit) — крайние версии все глючные.
http://rip-up.ru/vlc-media-player-just-crashed-what-to-do/ — как настроить плеер ответ здесь
Похожие вопросы
Ваш браузер устарел
Мы постоянно добавляем новый функционал в основной интерфейс проекта. К сожалению, старые браузеры не в состоянии качественно работать с современными программными продуктами. Для корректной работы используйте последние версии браузеров Chrome, Mozilla Firefox, Opera, Microsoft Edge или установите браузер Atom.